Hello Readers!
How the heck did it get to be November already? Seems like yesterday it was just January....
The older I get, the faster time flies it seems.
At any rate, I'm back again with more projects to show and a bit of rambling on like usual.
Let's get on with it...
I showed you all the fabric beads in this bag in the last post. The bag is crocheted with eyelash yarn. I didn't, but should have, lined the bag. At least lined the part behind the beads. I may still do that. I'm not totally in love with this bag but I'm not the one who should be saying whether it is any thing of beauty or not. It was fun to make and to me, that's the most important part of it. If it isn't fun in the making, I don't usually get it completed. That goes for just about anything I make.
This bag isn't quite finished yet. The white belt laying atop it will become its handle/strap eventually. I used some more of the fabric beads on this colorful bag but I lined the bag only behind the beads. The round medallion on front of the bag is a lined pocket. You'll see this bag again once I've embroidered on the belt and attached it to the bag. It doesn't look like much at the moment.
This bag is made from the seams of a few different garments I destroyed to use the fabric for other projects. It is crocheted with three different colors of crochet cotton in the coil method of making baskets. In other words it is one long coil formed into the bag by crocheting instead of sewing as one would do to make a basket if one were following the rules of coil basket making. I've never really followed rules in crafting. I just make it up as I go!
Garments destroyed included a leather jacket, a soft pink acrylic sweater, a velvet jacket, and a couple of cotton shirts.
This bag is rather large and would make a great market bag. I gave it long handles made from poly rope covered in the pink sweater material. I first haphazardly sewed the fabric to the rope and then wrapped black crochet cotton around the length of the handles before crocheting them to the bag with black tshirt material.
This is a much smaller bag made from the same technique and materials as the previous bag. I made the handles from the poly rope but wrapped the sweater material around them instead of sewing it like in the last bag, making the handles much thicker. I'm not crazy about this one either but it is what it is.
This bag is made from a grey sweat shirt material and a fuzzy white sweater material. The leaf was already embroidered on the sweat shirt before I destroyed it. This one has lined bottom piece made from corrugated plastic. I braided the handle out of the gray sweat shirt material. It is all hand sewn, no machine involved. Though I really do want a sewing machine and some day I may just get that wish granted.
I made a book a few days. I forget what kind of box I used as the cover. I'm thinking it was a mac and cheese box, but I'm uncertain. At any rate, the cover is covered with died paper towels.. I got a new set of Dr. P.H. Martin's inks some time ago, like a couple years. I played with those inks shortly after I got them and dyed a bunch of paper towels. This is the first project I used any of those paper towels in. The book is about 7x4 inches or so. I didn't measure, just eyeballed that measurement.
It has four signatures of 12 papers each of different kinds of paper. It's a junk journal more or less. I sewed it with bright orange friendship bracelet thread in the pamphlet stitch.
Here's a sneak peek at the bird and nest that will end up on a light pole in Lucas, Kansas. I will deliver the little guy sometime next week probably. The nest is crocheted poly twine. The bird is a conglomeration of a kid's rubber ball, a lot of polyrope, some bottle caps, a couple of googly eyes, an aluminum can, some chipboard, some aluminum foil tape and a boatload of E6000 to keep it all together. There's also a bit of sewing thread and a whole bunch of plastic grocery sacks to fill the ball to keep it solid and round. I cut a hole in bottom of the ball before transforming it into this silly thing. After the bird came to life, so to speak, I put the plug back in the bottom of the ball after filling it with grocery sacks. You can't tell too well, but the bird has wings as well.
I was asked to draw a chicken on this big chalkboard. The chicken is about 20x20 inches...didn't measure this one either...I drew it in chalk pastels. I realize his head is a bit flat. He's a flat head chicken. Least that's what I call him. I could have probably fixed the rooster's head but my sister-in-law loved him as is. I really need to practice using those chalk pastels!
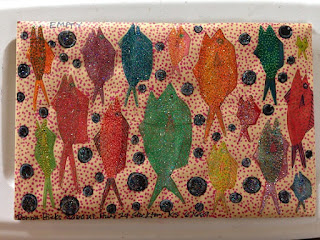
Here is the front of the envelope I sent to my EAU partner for October. I didn't even put October and Halloween together until I was done with this envie!
I'm a little slow in the thinking department at times! The fish are drawn with markers first, then details were added with my new nail art pens. Then they were given a coat of dimensional magic. The dots on the background are nail art pens.
You all have heard of paint pens. Well, these nail art pens work just like the paint pens but they have a much finer tip than any paint pens I've ever seen. I got my nail art pens off ebay. I'd have to go into the other room to make sure, but I think these pens are called I heart nail art pens. They're made by Sally Hansen. They cost about $6 each if you buy them in the store. I got 22 of them for $24 off ebay.
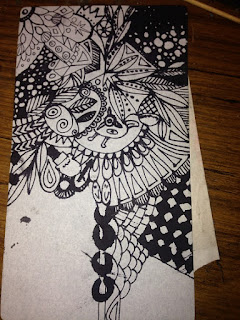
I was gifted a giant stack of these magnetic school schedules from the past. They measure 4x7 inches. I put some in a pan of hot water and soaked the paper layer off the top of them.
I then drew some pictures and voila we have decorative magnets!
chickens
gel pens
doubt kills....
markers
flowers
gel pens
unfinished zentangle
ball point pen
The ball point pen bled a lot! Gonna cover this one and start over again.
colored zen with yingyang
gel pens
sorry for the flash
and last but not the final one
paisley
gel pens
That's about it for the projects for this post.
I'm working on another bag, some embroidery and still working on the granny squares for the newest blanket. Always something going on here.
Thanks for hanging in there to the end of this!
Remember
be kind to one another!
It matters!
Peace
831


2 comments:
I love your flat headed chicken ;) and please post pictures of the finished light pole...
What a genius use of the school magnets! :D
Post a Comment