25 January 2013

Dolls, Origami and Drawing

Hello Readers!

I've got some new projects in the works. I always have something on the back burner and juggling my recipes to come up with finished product. 
Sometimes the juggling goes on for days and sometimes it comes together quite quickly. 

I started two icicle dolls with no idea what will become of them. I was sitting here watching a movie and my muse started screaming about wanting to make faces. So I dragged out the polymer clay and fired up the oven. 

These two faces appeared within half an hour. 
Then I wondered what the hell am I going to do with these? They kinda creep me out just a little. I went to the www to surf in search of something to do with these guys. I thought I was shooting for a feminine face. I didn't quite hit that mark. 
I found a tutorial for this doll that requires NO sewing if aren't inclined to sew anything on it. I'm still working on these two. I made a crown out of a piece of aluminum foil that once sealed a coffee can. I glued it to the face on the right but it didn't quite work out well. I think we need to get out the big guns! E6000
They need a lot more work before I can call them done.

I did some drawing. The girl is in gray sharpie, the rest are black sharpie. All done on manila paper. 2x3 inches
I did all of these in a space of 45 minutes or so.
The guy with glasses will be mounted on an ATC base and go in my own collection. The bird will probably end up on a book cover and who knows with the other three.

While I had the polymer clay out and the oven fired up, I made some funky beads. I believe they'll get a splash of color before I call them done. None of them are longer than an inch.

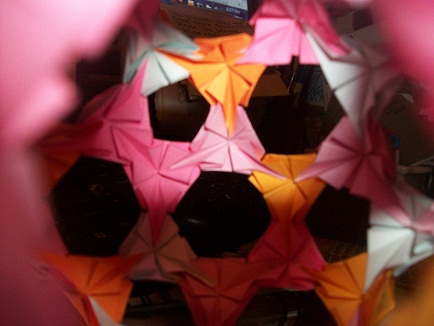
I made another buckyball. Wish I could say this one is a success but it isn't. The ring of units dead center in the picture is the reason this thing isn't ROUND, like it should be. I've made 5 of these things and have a terrible track record of successful outcomes! I've only gotten 2 to come out round. You REALLY have to be paying attention when you put these things together! There shouldn't be any rings of units with seven  units comprising it. There should be only 6 or 5 unit rings.

The makings of the buckyball above. I had leftovers from the pink one you saw the other day. I had a few left overs from the green newsprint too. I've started cutting more triangles for the next one. It will be orange and white. I'm using orange envelopes with white insides. 
There will not be another buckyball made from the drug pamphlets. aka newsprint.

The previous two failed attempts at assembling a buckyball were not done in vain. I couldn't even get them to close up and become a ball, lumpy or not! I used the units from those two on the last two mixed media fish pictures on large canvases.  

This is the altered envelope for my partner in the altered envie addicts group.
Acrylics on plain white envelope. The tail goes around to the backside.

My old body has been in rebel mode and I've really not accomplished all that I wish I had since last here. Some days I don't even feel like crawling out of bed. Today was one of those days. 

I showed you all the butterfly garland hanging from the ceiling in my deskroom. You all could see all the things hanging from the ceiling in those pictures. I thought I'd show you one of them close up today. Actually there's two of them but it's the airplane I'm really showing off. The thing behind the airplane is a rock with crochet covering it. It's an Apache Tear rock from Arizona. I don't know the scientific name of the rock. I have a ton of them. This one is about an inch across. 
I wanted to show off the airplane cause it's one of my favorite things hanging from the ceiling and it is the oldest thing hanging there. 
When I first moved to Stockton about 20 years I got three of these little airplanes at the thrift store. I bought them because they were really cool! They're just little plastic biplanes. The green one and the yellow one have disappeared in the travels of life. I've moved 4 times since I moved here in 1995. I found this one out in the burnt house a couple months ago while going through junk out there. It was a good surprise to find it. I thought the airplanes were long gone! Last I had seen any of them was in 2000 when I moved east of town for the first time. The only room in the house that wasn't really damaged beyond help when the house burnt in 2005 was the garage. There was stuff in the garage that had never been unpacked from moving there in 2000. At any rate, the airplane is still around! Just hanging out with me in the room where I create. 

I'll be back in a few days with more things to share with you all. 
Thanks for reading!
Have a beautiful day!
Be good to one another!
It matters!
Peace
831

22 January 2013

Butterflies, A Frog and Some Cool Origami Magic

Hello Readers!

As I promised yesterday, I have pictures of the Butterfly Garland hanging from the ceiling in my desk room. I'm afraid the pictures really don't show just how cool it does look hanging there!

As you can see there are many things hanging from the ceiling.
The little butterflies just added to the chaos. 
I am a fan of chaos. I like my space filled to the brim! 

Just call me Messy Marvin!
Some of the things hanging from the ceiling are experiments in origami and paper manipulations of one kind or another. Some of the things are just things I found to my liking. Like the green hummingbird ornament and the little elephant ornament. Someone gave me the elephant...I forget who.

And as you can also see, the wall is covered in stuff as well. 
Everything on the wall, well, most of everything on that wall is stuff for making other stuff. I have a problem with 'out of sight, out of mind'. Truly if I can't see it, I forget I even own it!
I am very, very pleased with the butterfly garland. Once I retrieve the other butterflies from behind the desk, I think more butterflies hanging from the ceiling are in order! There is still plenty of space!

I made another buckyball yesterday.

I don't know what possessed me. These things take HOURS to make!
First the triangles had to be cut. 
I needed 60, I cut more like 70 of them. All had to be measured out with the template and cut by hand.

Then I had to fold 60 units to form the finished ball.
Paper used is from an unlined writing tablet. There are two shades of pink, two shades of orange and some very light blue. Copy paper weight.
You don't want wimpy paper when you make a buckyball. But you don't want really stiff paper either. Copy paper weight is perfect!
I really like this shot looking into the inside of the buckyball.

The colors are way off in this picture. This is to show the size of the finished ball. I didn't measure it. But it's about the size of softball, just a touch smaller.

True colors in this picture.
The buckyball is the only thing I accomplished yesterday. That and listening to documentaries on hulu.com while folding the units. 
The units go together without glue or anything but they don't stay together with no adhesive. I used quick dry adhesive made by Elmers.
I've no clue what will happen with this. It may end up on my ceiling or it may end up at the Art Center in the gift shop with a hefty price tag on it. It does take HOURS to make one from start to finish. I spent about 9 hours on it. Not difficult to make, just time consuming!

I guess I did get this little frog done yesterday morning before the idea of the buckyball hit me. He was drawn the day before yesterday. I just put a coat of glitter paint over him yesterday morning and secured him to a postcard backing. 
He's done on cardstock in markers.

It is 7 a.m. on Tuesday, the 22nd of January right now. I don't know what will be accomplished today. Someone really needs to do the dishes and someone should probably get a load or two of laundry done today as well. I'm running on 9.5 hours of sleep so I should be good to go till around 5 p.m. or there abouts. I got up at 4:30 this morning!
I may finish up the little fairy I started the day before yesterday. She's about half done. 
Well, until next time:
be good to one another!
It matters!
Peace
831

20 January 2013

Owls, Snakes, Butterflies and Chatter

Hello Readers!

Looks like I've been busy for the last few days what with all these pictures in this post. I can assure you I feel as though I've accomplished little in the arena of life. I really have no reason to feel this way other than the kitchen counter is covered in three days worth of dirty dishes and the laundry is piling up. 
My old body has been in sleep mode for a few days. I did a 30 hour stint in bed. Asleep for about 90% of it. I totally missed Wednesday!
It has been said (many times by me alone) that creative people have better things to do than the dishes and laundry! I'll get around to those one of these days!
Probably later today actually...

I must warn you the pictures are awful! I still haven't figured out the scanner. It refuses to turn on when I hit the 'on' button. I've crawled under the desk once to make sure the stupid thing is plugged in. It appears to be. I need to find someone who can crawl around under the desk, behind the cabinet the scanner sits on and can contort themselves to reach behind the cabinet to retrieve all the necessary cords...a stout man with computer knowledge needed.... My old body just laughs at me when I even contemplate the thought of going on that journey again! I had a hell of a time getting up off the floor the only time I've attempted it! And to change out the scanner with the perfectly good scanner out in the burnt house will require someone with the same qualifications to install it in the dead scanner's space. So, pictures will suck until further notice. I do get them 'right' on occasion, but scans of ATCs and smaller art is so much nicer! 

In the meantime though...let's take a look at the stuff that's kept the housecleaning fairy in me from getting anything done!

I think there may have been a bloody brawl between the housecleaning fairy and my art muse. I'm sure that was blood on the kitchen table yesterday while painting the owls! Might have just been fingernail polish though. I much better like the art muse than the housecleaning fairy! 

I told you all about the letter openers the last time I was here. I dragged out another half dozen of them and put owls on them.

Goofy looking owl, this one is.

A group of three.

Another group of three. These 3 were the first of the owls started.

this guy looks like he has paws other than bird feet.

The dots don't show well on his tummy.

And another group of three.
All of them are done in fingernail polish, same as the flowers from the last post. I like the owls better than the flowers. It isn't up to me which is liked best though. We shall see what the boy comes up with once he gets all the letter openers in the mail. I'll be packaging and sending these come tomorrow.
Fingernail polish is a stinky affair!

If you all haven't heard of Shoo Rayner's Drawing School on YouTube, you really should check him out. He's an interesting fellow and he makes learning fun.
Anyone can learn to draw!
Snakes are one of the lessons Shoo teaches. There are literally hundreds of tutorials for learning to draw a great number of different subjects.
ATC
markers on cardstock
blue snake

ATC 
markers on cardstock
green snake

Macrolepiota procera
black sharpie on cardstock
ATC

pen and ink mushroom
black sharpie on cardstock
ATC

I was surfing earlier and ran across some botanical drawings of mushrooms. I'm rather pleased with my attempts!

This is the wood book cover I showed you all in the last post. I've painted a snake on it in fingernail polish. I really like the effect the polish gives. It looks almost like enameling on wood. I put a coat of gloss gel medium on the wood before putting the snake on it. I drew the snake freehand in pencil on the wood and then went over the lines with black sharpie. 
Fingernail polish is transparent, for the most part, and any lines you put down will show through it. I learned that with the owls on letter openers. If you look close you can see the lines I put there with the black sharpie. Those lines do not show up so well on the snake though.
This little book will be sewn together probably sometime this evening. The page block is handwriting paper. 8 signatures of 5 pages each. The covers are 3x4.5 inches. I'll use embroidery thread to sew it together. I'll remember to not be too heavy-handed with the sewing as to not muck any holes! 

You can learn how to draw a bulldog with Shoo Rayner.
This one is about 3x4 inches on cardstock in markers. I'll cut him out and he'll end up on a book cover or a postcard. I think he may be a bit large to end up on a chunky page. You'll be seeing the bulldog again on a finished project (sometime in the future.)

Shoo Rayner will also teach you how to draw a giraffe. My paper wasn't big enough to draw the whole giraffe, but Shoo will teach you that as well. This is a tiny giraffe. The paper he's drawn on is only 2x3 inches. He's done in markers on manila paper. Who knows what will become of him.

Doodle 
This one will end up on a book cover.
markers on manila paper
2x3 inches

owl orange belly
book cover markers on manila paper
2x3 inches

pink eyes owl
markers on manila paper
2x3 inches
another potential book cover

Owls are on the muse's radar this year! We'll see how long they stick around. I rather like drawing owls. 

Doodle
potential book cover
2x3 inches
markers on manila paper

Doodle
potential book cover
2x3 inches
markers on manila paper

You all have seen these sheep before. And the star garland also. 
I gave some of the sheep away at Christmas. Everyone loves sheep. 
I gave one of the star garlands to my dil, Lue. Other dil, Terah needs one too. 
I'm showing off the butterflies though. I really need to put the sheep in the suitcase.
I think you all will see the butterflies again too. I think a stripe of black puffy paint for a body would really bring them into focus! The magnet fragments worked well. 

This white metal cabinet the magnets are stuck to is my pantry. 
Ma made that blue magnet with the orange spider on it. We need to do another junk magnet making session! 

I used up all the magnet fragments I had. I think I ended up with about 15 butterflies with magnets attached.  Tippy cat knocked the paper plate holding the remaining butterflies off the tower yesterday. I need that person to do something with this mess also. I can see them down there on the floor. Yep, there's the proof. But no way I can get down there and pick them up! Not easily.
The day before yesterday, I knocked one of the butterflies off the garland I showed you all in the last post. I wasn't sure what to do with the butterfly garland. Garlands aren't really my thing. I was only walking by the butterflies when I knocked one off. I hung them from the ceiling in my deskroom and I really like what happened. I'll show you a picture in next post.

A single butterfly magnet with altered key magnets you all have seen before.


Go make some butterflies. They're addicting!!!
Be good to one another!
It matters!
Peace
831


18 January 2013

Butterflies, Chatter, Critters and Other Stuff too

Hello Readers!

Not much in the creative mode has been happening here of late. Not as much as in the past anyway. I do try to do at least one creative thing a day but that sometimes carries over to the next day. And some days it carries over for a lot of days!

My muse is quite fidgety this year for some reason. 
I have lots in my head but getting the hands to cooperate in seeing those ideas to fruition is a whole other thing! 
I plug on though.

I found a tutorial for paper butterflies the first week of the month and have made a boatload of them.

I don't know how many there are on that paper plate...somewhere around a hundred of them. I made them in one evening sitting in front of the computer watching reruns of this and that on hulu.com. 
Remember, I don't own a TV. So watching tv consists of sitting in front of my computer. That's quite fine with me, I'm always in front of this pc anyway!

These butterflies are exactly like the single butterfly I showed you all in the last post. That one was 2 inches across, these are only 1.5 inches across. I used up my stash of little bits of wire on these guys.
I got that little china dish for Christmas from my Mom. It is the most useful thing!

This one and the blue one above are both made from magazine paper.

This one is made from book page paper. That's Russian text on it.
The magazine paper is flimsier than the book paper but both make nice sturdy butterflies.
I had no idea what I would do with a hundred (or more) little butterflies. I mulled it over for days.
Then....

it hit me! 
Make a garland! So I glued 10 butterflies to a length of thread and ended up with a not-so-great garland. It tangled up something fierce when I picked it up from the table top after the glue had dried. But I got it untangled and (temporarily) hung it in the kitchen doorway.

Now to figure out what to do with the remainder of those butterflies! 
I'm thinking a few magnets are in order. I have a bunch of magnet fragments that would work wonderfully with these light little butterflies. Won't take much of a magnet to hold them to a metal surface as they weigh next to nothing!
They really are cute little things and so very easy to make! 

My new journal for 2013.
I didn't like the way the covers turned out so I decided to just keep this book and use it for my day book this year. It has 14 signatures with 5 sheets in each signature. Copy paper. I can never remember how to determine just how many pages a book has. There are 20 surfaces to write on in each signature so if we count each surface as a page that would give this book 280 pages? It's a nice fat book.
Sometimes the pages don't get sewn tight enough and you end up with a wobbly book but this one went together quite nicely and the wobble is at a minimum. 
I really don't like the look of the covers though. That glitter paint didn't cover evenly, even after getting two coats.
This one is 6x4 inches and about 1.5 inches thick.

I told you all about the wood veneer I found at a yard sale in the summer. I finally got around to doing something with a couple of pieces of that.

Wood cover book. I need to sew this one together still. It's 4.5x3 inches with 8 signatures of handwriting paper. That would be the paper kids use to learn how to write their letters. I get pads of it for a $1 at the dollar store.
I will probably sew this one with embroidery thread as I have a length of it left over from another project that will be perfect for the size of this little book.
I varnished the wood surfaces of the cover. This one will remain plain.

Another wood cover book. I painted the owl in acrylics then varnished the whole thing; front and back covers both. It is 4.5x6 inches with handwriting paper (same as the little book above). 8 signatures of 5 sheets each. 
I sewed it together with regular sewing thread. I will have to remember to be a bit more careful in sewing the wood covers. One of the holes on the back cover was breached in the sewing and it's a good thing it was the middle hole cause that hole is useless now! It doesn't really distract from the book in any way cause the other four holes hold the page block in place. I was just a little heavy handed in the sewing!  Good thing is that this little book is not wobbly either!
That wood veneer is more fragile than I first thought!
I think the next wood cover book I'll line the covers with chipboard....I don't know. I really like the look of the wood and if I cut it correctly it will be OK with just wood. I ruined one sheet of the veneer by cutting it the wrong way. Those pieces will turn into postcards with a chipboard backing for mailing.

It does take varnish and paint quite well though and you will see more of these little books in the future. I have a wonderful array of 50+ different woods to choose from. Large books, like the owl won't be as prevalent as littler books, like the first in this post because I only have 8 sheets of veneer large enough to make a book more than 4 inches square.
There are some beautiful woods in the smaller size though and I will be making some little books! Lord knows I have enough paper to make the page blocks!

My eldest son came up with the idea for the letter openers below. I'm uncertain just how many letter openers we still have out in the burnt house. I'm thinking there were two boxes of them but after moving all that stuff around out there, I really don't remember. I went out there to locate the letter openers and found a five gallon bucket and a cat litter bucket full of them. I'm thinking there are around 1000 of them. 

He called me on the phone the other morning and woke me up to tell me about it. I got busy and came up with these designs later that day. 
Acetone took the BROOKE logos off the letter openers with no trouble at all. I did an experiment to see what would be best to paint on them with. 
Acrylics stuck to the plastic but it scratched off too easily so I dragged out the box of fingernail polish and used that instead. It seems to be quite durable. I'll be sending these to my son and he will show them to his buddy who I am hoping says, "That's exactly what I'm needing!" I'm going to paint a few more with different designs and send those along to my boy as well. The more there is to choose from, the more likely the man will find something that appeals to him. The boy did say though, "I need something 'girly'." 
I'm not real crazy about the green and pink one up in the corner.

This is the beginnings of a 5x5 canvas painting. I'm not sure just where it is leading to. It stopped talking to me mid stream and I abandoned it for the time being. Perhaps it will show up again in the blog as a finished piece. 

Envelopes are always on the muse's radar. This one is sharpie and acrylics on plain white paper envelope. He's not quite done yet.

Fred says, "Hello!"

Lola is being unsociable.

Murray's trying to take nap on the kitchen floor.

Tippy wants some attention too! She was NOT helpful at all while I was trying to take pictures of the letter openers! 

I hope the new year has started on a high note for you all. 
Be good to one another!
It matters!

Thanks for stopping by!
Peace
831

Followers