27 March 2013

Baskets, Cone Dolls and Origami

Hello Readers!

You might want to grab a cuppa something and settle in. I might have a lot to say today.  It's been a few days since I was here. I discovered a new obsession. I think though, that it is winding down....
Who knew making coiled baskets could be so darn easy! I don't recall just how I got started on them about four days ago but I've made six of them and have a seventh in progress. I'm thinking I should make a large one out of plastic grocery sacks and white crochet cotton. We'll see if it materializes. 

I had this big ball of red string in my yarn basket. Someone gave it to me sometime or another. I was doing crouching on the cone doll bodies (you'll see them shortly), looking for yarn to use on those when this caught my eye. It was red. I needed some red. It was after playing with the cone dolls that the idea for coiled baskets came to me. As you can see from the picture, this is some THICK string. It's made of some natural fiber. It's kinda like really fat twine except there is no braid to it.


I whipped up these five red baskets in two days time. 

This one has a row of nubby yarn around the rim of it.


The biggest one is about 6 inches across and the smallest one maybe 3.5 inches. I don't know the true measurements. I didn't measure them. It's all guesswork. 

I was really stoked about how quickly the red one's worked up so I got out some other thick string. The brown one with orange is about 4 inches across and maybe 3 inches tall. It didn't work up near as quickly as the red baskets did. I'm going to make a lid for this one and turn it into a round box. 
The bigger weaving beneath the little one is a work in progress. This one is made from some man made macrame cord that was more than likely produced in the 1970s. It's not quite as thick as the red string was but it's much thicker than the brown string is. I'm working it up with three different colors of crochet cotton. The pink crochet cotton is all but gone. When it's gone the sides of this basket will have only green and orange cotton thread. This one is about 6 inches across. It is still to be determined how tall it will be and whether or not it gets a lid. I have quite a bit of the macrame cord but I don't know how much ambition is still left.

Remember these?

I'm going to show you what you need to make one of your own.

I opted to make six more of them, but you can do however many you like. I find it is easier to do multiples with these guys.

You'll need :
 quilt batting or fiber filling
bamboo skewer or similar type stick
string 
some fabric scraps
fibers for embellishing
beads, doodads, whathaveyous
a face of some sort
scissors
glue
needle and thread (optional)

I used cotton material on the six in this post. You won't need very large pieces.

I gathered together various types of strings for embellishments.
Use what you have on hand. 

My doll bodies range in length from around 13 inches down to around 5 inches. You make yours whatever size you want.  Wrap some fiber filling around your stick and secure it by wrapping string around it. I used white crochet cotton thread for this part of  process. Don't worry about neatness. No one will see this part. Your goal is get the fiberfill around the stick.

Don't wrap your string too tightly. You want a little bit of give to the fiberfilling.

Now do the same with your fabric pieces.  Sorry I didn't take any pictures of this part. Basically just wrap the fabric around the fiber filling and wrap it with pretty string to keep it on. Again, neatness is not essential. Though, if you want it to be neat, you go right ahead!
I cut my fabric into strips about 2 or 3 inches wide and however long the fabric happened to be. That orange one on the right was not a very large piece of fabric so it is not one continuous strip like the others are. Just make it work. If your fabric doesn't cover it all, add some different fabric to the mix. Play with it. Make it work!

I used a variety of strings on these six bodies. 
From left to right in the picture above the one above:
purple acrylic yarn
yellow crewel embroidery thread
pink crochet cotton thread 
black hemp cord
varigated green crochet cotton thread
pink crochet cotton thread

Any thread, yarn, ribbon, ect will work!

Now we are going to embellish them even more.

The fuzzy pink one is a bit strange and I really don't know where it is going to lead! They're all a bit wild, actually....and I've no clue where any of them are leading either! 
The second in line has green crepe paper crouched on with different colors of embroidery thread. I was going for swirls and the like. Leave a spot clear to adhere the face.
Third in line is the orange one with strips of yellow fleece sewn on with embroidery thread.
Fourth in line is the black hemp cord with yellow fleece crouched with blue embroidery thread.
Fifth is the fat red string and yellow crewel embroidery thread.
And lastly the green one is wrapped with crochet cotton and crepe paper crouched over top. 
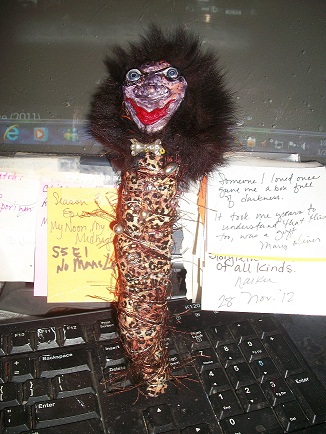
Once you get your bodies made, you need to doll 'em up, make them your own.

I made the faces for the two I've shown you previously. Those were made from polymer clay and sculpted by your's truly. I made the two faces in the photo above also. The red one is made from cuttings from that fat red string I used on the coiled baskets. It's all held together with some white glue. The one on the left is made from toilet paper and varnish. I'm uncertain why it dried to that awful brown color but that's what it did! The green eyes are simply beads with their holes hidden. I'll be painting the TP face for sure! The red one will get some eyes of some sort and will probably be left the color it is. It will go nicely with the red and white body.

I don't know if this helped or hindered in the quest of cone doll making.
Hopefully it didn't leave you dazed and confused! 


I haven't done a lick of drawing since the last post. 
I still haven't sewn those little books together.
I have a stack of mail I need to get ready to go to the post office.

All I've accomplished is weaving and folding....and watching Project Runway reruns on hulu.

Magazine paper woven coaster. I had one of these on my desk for ages. For being made simply of paper and string these things are quite durable! And easy to make as well! This one is about 4x5 inches.

The crane flock has grown by a dozen. 

I really do have weaving on the brain. I spent hours last night looking at youtube videos of how to weave baskets. I found one that I'm going to try out in the future. This will be the only place to find it!

Thanks for stopping by to see what's happening!
Be good to one another!
It matters!
Peace
831

23 March 2013

Paper, Fabric and Beads


Hello Readers!

I saw my young friend the other day in the deli when I was in there picking up some fried chicken. The boy told me to behave myself. If he only knew how busy I've been with folding origami cranes, he would have known I have no time to misbehave myself. 
Dang it. A misbehaving might do me good.

At any rate I've been a busy girl since last we met!

The origami crane flock is growing steadily.

There's 54 of the little devils strewn across my desktop. 
I folded these over a two day period. Tuesday into Thursday.

59 of the little devils in their box. I folded all of these in the past two days. Thursday into Friday.
I packaged up 100 the other day and then packaged up another 50 a few hours ago.
I've no idea when the obsession with the origami cranes will end. Guess I'll shoot for 1000 and see what happens?
I kept one of the little cranes I folded yesterday. I threaded a length of regular sewing thread through him and hung him from the ceiling in my deskroom. He's made from green foil used in wrapping flower pots from the florist. It's green on one side and lovely shade of purple on the other. I made cranes of various sizes of the stuff. Gave me ideas of folding cranes out of aluminum foil. We'll see what happens on that front as well.

And beings origami is strong on the radar, I folded this cute little cube. It was an experiment just to see if I could actually pull it off. Not all origami attempts are successes! This one was though. I may make a few more of these though I've no clue just what their purpose may become.

I'm done with the star project.
All that's left to do is decide which of them will go to Texas for the swap and get them headed in the right direction.
I gave two more of these stars away the day before yesterday. I didn't actually give one of them away. Ma decided she really liked one of the magazine paper stars and she said, "I'm taking this orange star." I couldn't very well tell her 'no, you can't have any of those stars'. She had just got done hanging a lamp above my desk where I'm sitting typing out these thoughts. She could have taken all but ten of them and I'd of let her do it.

I made a basket Friday morning. I started it on Thursday evening but it needed to dry before I could proceed with the actual weaving of it. 
It stands about 5 inches tall and is just over 6 inches across at the top. It's made completely out of paper. 

I used twisted paper for the weaving. The ribs of the basket are rolled up magazine pages. 
I like to do weaving. I've been wanting to do a basket for a few weeks now. I found a tutorial that demonstrated how to do the ribs of a basket and that's where the inspiration came from. Anyone can do this simple weaving. The tutorial was using traditional basket weaving materials. I have tons of paper so I went that route instead.

The bottom of the basket is two rounds of chipboard (from a couple of puzzle boxes) with the paper reeds glued in a ray around that circle of chipboard. Then another circle of chipboard was glued to sandwich the ribs between the two. I put the nursing manual (fat book) on top of it overnight so it would dry flat and be well stuck together.
Weaving it took all of half an hour or so.
I'm quite pleased with the outcome. I'll do a few things differently in the next one that should improve my technique but overall, I'm quite pleased with it.

I made a bowl from magazine paper and watercolor paper a couple mornings ago. I folded all the units for this bowl, probably two years ago. I found a new way to put these things together that doesn't involve needle and thread. I never did, even after sewing the laptop bag and the other basket I showed you all, learn how to sew these together right. This method worked well for this little bowl but is useless for a larger basket or a laptop bag. So, it's good to know more than one way to skin a cat!
Ma wants a large basket made in this technique. I'll have to get busy and fold more units to make that happen. 

Easter will be here before we know it!
I sewed this little yellow felt chick Friday morning. He was an experiment. He needs some tweaking if I'm to make more of these little guys. 

I still have not sewn that little book I keep promising to show you all. It goes nicely with the page block I cut a couple days ago. I need to make some covers for that page block...

I finished the icicle dolls. I'm not sure what to call these dolls. Cone dolls, icicle dolls, no sew dolls? 
These things are just about the wildest things I've ventured into where art is concerned. I've never made anything quite like these two before.

I put a bunch of yellow beads and a few purple beads on this one. I can't call these two no sew dolls cause I sewed those beads on so they were sure to stay where I put them! There are natural stone beads, wooden buttons, glass and plastic beads on this one.

This one is just a riot if you ask me. She makes me smile. Her hair is real fur from a fur collar. She has various silver colored beads sewn randomly on her leopard print garb. The bow tie shaped bead at her throat is a plastic bead. Some of the silver beads are plastic, some are metal.

Both are about 8 inches tall.

I still need to make a tag of some sort to sew to these two to identify them as my work. Not sure just how I'm going to accomplish that but I'll think of someway to sign them.
I surprise myself sometimes! These two have done that!

It's been a long day. Snow is expected again overnight. I woke up early on Friday to find the front porch covered in about an inch of snow. The yard was covered as well in most spots. All that snow was gone by noon. 
Let's hope for not too much snow. Weather gurus are saying six inches. I'm hoping not quite that much!

Thanks for stopping by!
Be good to one another!
It matters!
Peace
831

19 March 2013

Stars, Dolls and Cranes


Hello Readers!

It's a chilly morning in NW Kansas. I've been awake for about an hour and a half now. It's about a quarter to eight, the sun not quite high in the sky. I don't think it is going to be very warm today.
My back is giving me a lot pain so I'll probably spend a lot of my time today laying in bed reading The Appeal by John Grisham. 
Ma brought me that book the other day when I saw her. It's a first edition and one I've not ever read! I am trying to collect a copy of every book John Grisham wrote. I'm only missing a few of them at this point. First Editions are a bonus! I started reading it yesterday afternoon when the old back decided to be a bear of a companion. I'm hoping it's just the fibro acting up and there is nothing actually wrong with my back. Back problems run in the family and I don't want major back problems, I already have enough other medical problems to deal with!


I made origami stars yesterday. 
LOTS OF ORIGAMI STARS!
One side...
and the other side.
This one is made from newsprint paper. Getting some more use out of the drug pamphlets the Chief gave me last year. I still have a LOT of those pamphlets to something with. You'll probably see more of these stars made with different colors of paper from those pamphlets. There are 10 pamphlets in each box and each pamphlet is a different color I do believe.

I got the 3D watercolor paper star to do what I wanted it to. This is the white star from the last post that I said wasn't put together right, wouldn't stay glued together...I'm not sure just how I fixed it, but I did. Then I painted it with dark gray nail polish and bright pink dots of the same. There's a magnet inside this one so it will stick to a metal surface. That's one powerful little magnet inside this star! Overkill really, for something that weighs next to nothing! I gave this star to Ma day before yesterday.


A pile of stars.
This is all the stars I've made since I started this star project. Most of the origami stars in this picture were made yesterday. The ones in the front are are made from magazine paper. As soon as I figure out which ones are going in the swap, I'll take another, better, picture of them.

I just don't know about these two dolls. I painted their faces with fingernail polish yesterday and I'll do a bit more (of something) today. Not sure just where they're heading. They're taking their sweet old time about going though! This is not the last of these two characters!

I promised to show you all the flock of cranes I've folded.

The flock has not grown in size since I last spoke of them.
I will fold more cranes in the near future.

I ended up with 10 felt shamrock magnets. I gave 5 of them away to three of my sisters, my mother and my aunt at the St. Patrick's Day Party my aunt threw.

I glued magnets to the backs of the bottle cap junk magnets.

I'm not sure what is on the agenda for today. I need to get mail ready to go to town tomorrow. Need to make out bills...don't need the sheriff coming after my hide for not paying my property taxes. Someone should attempt to do the dishes. There are 12 million different things that need done, but having the energy to do them is next to impossible today. 
Maybe I'll sew some little books together today. I still haven't done that one I gave you a sneak peek at the other day. And there are a couple more little books ready to go to the next stage as well. 

We shall see how my back and my muse play together today, if they play at all!

Thanks for coming round today!
Be good to one another!
It truly does matter! 
Peace
831

16 March 2013

Since Yesterday...

Hello Readers!

My desk is a major disaster area! 
I will have to deal with that later though cause today I'm working on shamrocks and little books. I know I promised you all a look at a finished book in this post but that is not going to happen. Probably the next post that book will show up again in a finished state. 
It is right at 11:30 Saturday morning. Tomorrow is St. Patrick's Day. I have to have 7 little presents ready for a party in the afternoon. I don't see that as a problem though. A challenge to be met is what it really is.
I'm ahead in that game though so no worries!

I got up around 3 this morning. The cat meowed and I was wide awake! I went to sleep around 6 or so last night. My brother in law, Micheal showed sometime after dark and woke my hide up, insisting...no INSISTING I haul myself over to Susan's house next door. I told him to give my apologies to his wife, my sister, Kathy but there was no way I was walking across the yard to Susan's house. I just physically wasn't able to do that! 
After about 10 minutes of his pleading..OK it wasn't really pleading...he went away and I went back to sleep. Right  back to sleep!
He brought me some acrylic paints and a good size bundle of felt in a few different colors. I discovered them again this morning when I was rummaging around for some yellow thread.
So waking at three a.m. wasn't a bad thing. I'd had plenty of sleep. I felt great when I got up. Had more energy than I've had in days!
That's the way the fibromyalgia works on me. I'm flat out one day, fine as frog's hairs the next. Later today I'll be hurting like a big dog. My arms are already tired.
But at the moment, I'm pushing forward cause the day is still young.

I'd crocheted this shamrock by 7:30 this morning. I threw away two petals I'd crocheted out of regular yarn. They were huge and not practical for what I wanted. This one is about 2.5 inches across and made from crochet cotton thread. Size 2 steel hook. It took me about 45 minutes to do this one. 

I need 7 of these by tomorrow afternoon. Crocheting wasn't going to cut it.

Felt. Excellent idea!
I went snooping around google images some more in search of felt projects involving shamrocks. I came across a headband with a three leaf clover on it made from felt. I hunted up a tutorial to show me how to make that three leaf clover. I simply added an extra 'leaf' to get a four leaf clover. Easy peasy! Takes all of ten minutes from start to finish. I'm thinking they need a bauble of some sort, something shiny dead center. I'll experiment with that. This one pictured is the only one done thus far. I've cut out enough pieces for seven more. 
I'll slap a magnet on the back of them and voila I have little presents for the party tomorrow and more to trade for the atart going on over at AFA.

I finished this little yellow beaded felt star this morning with my first cup of coffee. The other side is beaded as well, though it doesn't look as good as this side if you ask me. It has a magnet inside of it but the beads are too thick for the magnet to be very effective.
I'm almost done with my star project!

Another 3D paper star. Made from 140lb watercolor paper. Two sides glued together. I put the black marks on with a sharpie pen. This one has a copper wire hanger. 
That flamingo in the picture above the star is one of many. My sister gave them to me one day when she was going through stuff in her room. She had them leftover from her 50th birthday party. She is now 56. I was happy to get them. I've no clue what the heck I'm going to do with about 50 of them though. They have a 9 inch wooden stick attached. They're cute little things! One of these days something will come to me and I'll use them.

You all have seen this piece of magazine paper weaving before. About two years ago I wove all these little pieces together and then sewed the long strands together with blue embroidery thread. 

It ended up being a tube 7 inches in diameter, roughly 14 inches tall. I cut a bottom for it the other day. The bottom is part of a political yard sign that is made from corregated plastic. I've given the outside of the basket two coats of clear varnish thus far. It was really floppy and wasn't round at the top until a made a plug out of the corregated plastic and gave it some varnish to stiffen it up. I think a couple more coats of varnish won't hurt it at all. I'm going to put some dark colored paper in the bottom of it to hide the writing on the sign used for the bottom of it.

Pay no attention to my messy work space on the kitchen table. I need to put some clean paper down and so something with the one there! It'd make a neat book cover or background paper for the cereal box book.

I still have a box full of folded units to make more paper chains. I need to make some more coasters. I gave the laptop bag (made the same was as the basket) to my dil, Terah. As far as I know it's still holding up after a  year or so.

A picture of all the stars done in my project thus far. I need 10 of them minimum. I think there are 9 of them in the picture. It's not a very good picture, I know.
One of these days, should have done it yesterday! I'm going to go out to the burnt house and wrestle that scanner into the deskroom. I'm really tired of taking crappy pictures of some things. Other things, I have no control over having to take their pictures instead of scanning them. Kinda hard scan 3D things.

I've run out of pictures to talk about so I better get busy on the felt shamrocks!
I'll be back in a few days with more stuff.
Thanks for stopping by!
Be good to one another!
It matters!
Peace, my friends!
831

15 March 2013

I'm all over the art spectrum today.


Hello Readers!
You better settle in for a bit. I have a lot to say today.
All the snow melted except for a patch out behind the burnt house. The temperature is in the mid 70s (F) right now so I suspect the remaining snow will have melted by the time the sun goes down later this evening. 
Good Riddance to Winter, I say!

The cats were driving me and Fred dog a bit nuts for the past week or so. Tippy and Murray were in heat and it was more than a bit noisy at times! Fred was a might short with the felines and the felines were quite vocal about their plight. Lola's fat self sits and ignores all the ruckus as though it is of no concern to her.
Poor Tippy was hollering for "Hairrrrrrreeeeeeeee" for days! I kept telling her Harry wasn't coming and to just forget about it! She hollered on. Murray made noises I can't even begin to spell.

They both came home from the vet this morning. Ma fetched their furry hides home. They seem to be doing just fine after their surgeries yesterday. No kittens for us anytime in the future! And Harry is a distant memory.

I've been holed up at home with the muse working overtime! 
You'll understand as you read this post!

This stuff isn't posted in the order in which it was made, it's posted as it came out in the filing system. Organization is not my strong suit!

We'll start off with some altered envelopes.

They're a tad dark but a white pen will show up nicely on them for mailing.

The following zentangles are all done on a magazine page. The envelopes above are also done on a single magazine page.
I play hours of mahjongg on facebook on a daily basis and some days I can't help but do something with all those numbers. I have a couple notebooks full of pages of nothing but game scores from online games I've played. 
I turned numbers into art. You can call it whatever you want though.

I was going for an overall design with the intention of turning the pages into something other than a page out of a magazine. ELLE magazine in this case. All of the pages from the same issue.


I cut this one out in the shape of the design.
Just black sharpie on magazine page.

I think this is my favorite of them all. The circle with the writing around it to the left on the page says YOU exasperate me always. We all know someone like that! I think this one will end up in my cereal box book. I showed you all the beginnings of the cereal box a couple posts back. It will be a long time before the cereal box book is complete so don't expect to see it for awhile.
I rather like this one too. 
Black and red sharpie and white paint pen on magazine page.

This one will end up as an altered envelope more than likely.

I like the background on this one but it isn't a favorite. This one and the lady in the pink polka dotted dress will end up in the cereal box book I think.

I entered the Jar of Stars swap over at AFA. I've been working on them for the last 24 hours or so. I did have a sleep in there somewhere, but stars are on the muse's radar!

Wooden star painted with fingernail polish and then glazed with Modge Podge Dimensional Magic.

Another wood star done the same as the red, white and blue one.

And yet another wooden star with a fingernail polish and black sharpie flower covered in Dimensional Magic. 
That's some really cool stuff! This is my first venture using it.
I still need to do the back of the wooden stars. Probably more of the same as the front plus my info.

Work In Progress
beaded yellow felt star

5 point origami star
magazine paper
This star looks really complicated but it's one of the easier origami folds I've run across. Putting it together is the tricky part, though not difficult once you get the gist of it.
I'm going to make some of these with one dollar bills for my grandsons for Christmas this year. No, it is not too early to be thinking about it! Dollar bill stars would be a tad larger than this one is.

14 point origami star
scrapbook paper
I made this star at the end of 2012. I made five or six of these stars. A couple of them fell apart and the pieces are still apart! I'll glue this one together before it heads out with the rest of the stars for the swap.

copper wire star pendant with plastic blue horse bead.

This pendant was an experiment. I added the horse bead cause I cut the wire too short for the star to end up in the bail. The ends barely met! The bead took care of that!  Along with a bit of quick drying glue.

Watecolor Paper 3D Star
painted with fingernail polish

teabag folded star
book page
I really like this star. I made a boatload of these late in November of last year. This one was made at that time.

copper wire and glass seed bead star
My least favorite of the stars made.

The wire this star is made out is salvaged from an electric motor of some kind. I found a box of salvaged copper wire in my son's garage the last time I was down to visit him. I snagged a chunk of it! It's a nice color. Not all copper wire is the same color. 

Snake Book
I bought four of these little 2 year calendars at the Dollar Store the other day for 15 cents a piece. I took the calendars out of the covers and then altered the covers and put new paper in them and then put the cover back in the plastic cover the calendar came in. The original cover was just a thin cardstock  affair. I put some text paper on and then put pink tissue paper over the text, using white glue. The snake is painted with fingernail polish atop the tissue paper. The only problem is that it doesn't close properly. I've got it under the press right now and will leave it there a few days in hopes it will flatten the spine a tad. I sewed the new pages (white copy paper) in the cover with the pamphlet stitch.

My book press is actually three very thick books that have a spot on the book shelf in the hallway. One of them is a book about aviation history, another is an encyclopedia of animals and the other is a nursing manual. The nursing manual is almost 5 inches thick. The other two about three inches thick. The three books make a great press. I have sheets of plastic between the books as well so that numerous things can go in the press at once if need be. 

Lesser Goldfinch
Postcard
fingernail polish on cardstock

Some Thoughts on the Use of Fingernail Polish as an Art Medium
1. It stinks to high heaven! Ventilation is encouraged.
2. It comes in LOVELY colors covering the entire spectrum.
3. It blends nicely. Regardless of brand, you can paint one over the other so long as the lower layer has dried first. I use a regular paint brush unless I'm covering a large area with one color.
4. Some colors are transparent. The transparency can be a nice touch.
5. It is inexpensive and you probably have a few bottles already.
6. A little bottle will cover a large area. One bottle will last through several projects if you work on a small scale as I do.
7. The smell eventually goes away on your finished project.
8. It's some tough stuff!
9. The more expensive the polish, the nicer the coverage. You don't have to buy the expensive stuff but don't pass it up if you find some at a yard sale or thrift store.
10. Clean up requires some acetone which stinks as badly as the polish. Acetone is not expensive either. Look for acetone at the hardware store in the paint section. You can get a quart of it for about $4. Or you can buy it in 10oz bottles for $1.75 at Dollar General. 
11. Acetone evaporates quickly so your rinsing tub should have a cover.
12. Be careful what brush you use as some synthetic fibers will not play nicely with acetone. 

Ink Flowers
postcard
I got a new set of pens at the Dollar Store the same day I found the calendars at 90% off. Bright colorful pens. 
Ball point pen on cardstock

Underwater Scene
postcard
fingernail polish on cardstock
I do like the look of fingernail polish when used as an art medium! 

Zen Postage
ATC
markers and postage stamp on cardstock

Orange Elephant
postcard
ball point pen on cardstock

I have a few works in progress, in progress. This is the guts of a new book. This started out as a newspaper flyer that arrives in my mailbox once a week. 
I didn't take a picture of the other six pages (larger than these here) that are hanging on the line in the closet where I pinned them yesterday to dry. We'll talk about the ones in the picture here. I cut the pages 8x4 inches so I'd end up with a 4x4 inch book. They're painted white with wall paint...like you'd use to paint your walls! Some of them have tissue paper squares adhered with that same white paint. They each have two coats of paint. They need another layer of something...onion skin paper, tissue paper, gift wrap...something thin to make them a tad more sturdy and then I'll put some random papers with them for the page block. I'm still deciding on what the covers will be.

Golden Goose in Paradise
postcard
fingernail polish 
I always have a piece of paper, paper towel, something to wipe the brush on when I'm painting. Doesn't matter if it's paint, ink, fingernail polish or ketchup (there's an idea), I always have a waste paper handy. This is the result of the Lesser Goldfinch postcard and the other fingernail polish works in this post.

Owl Drawing
markers on orchard paper
3x4 inches
I'm not sure when this owl was drawn. Sometime last month. I found it buried in the pile of finished artwork on my desk and knew I hadn't shown it off yet.
Owls are hot on the muse's radar!

Brett
ATC
markers on book page

Abstract Eyes
Drawing
markers on textured paper
3x4 inches


I said I had a few WIPs on the table. This is another of them.
My plan is to have an alphabet book done for my granddaughter for her 4th birthday come August. (Is that child really already 4?!!)


The ABC Book will be about 6 inches square. I'm not that far into the book to be honest. Four letters an alphabet does not make! The drawings are done on plain copy paper in markers. 5 in squares.
You will see more of the alphabet book in the near future!

Aaron
ATC
markers on cardstock


Bottle Cap Junk Magnets
I played around with my gold sand, some painted beer bottle caps, a jar of junk and some dimensional magic. The resin isn't quite dry in the picture so some of them are a bit cloudy. These were pretty easy to do. The picture doesn't show at all any of the details. That gold sand is pretty cool. I'm not certain what the purpose of this gold sand was originally. My mother found it at a garage sale. It's in a jelly jar. It appears to be sand, spray painted gold. It's a very coarse sand. Reminds me of miniature gravel. A whole 12 oz jar full of it! She paid a quarter for it. I've had it for years and have used it numerous times, especially on the fish pictures I do on large canvases. It was a nice filler for these bottle caps. There are beads, broken jewelry, sea shells, doodads, ect in the bottle caps. I'll slap a magnet on the back of them once the DM dries in a couple of days.

Another little book. That's the inside of the back cover you're looking at there. Magazine paper adhered to chipboard. The fronts of both covers have a bit of fingernail polish on them to dress up those magazine pictures! 
You'll get to see it in the next post. It's all ready to be sewn together as soon as I put some holes in the covers to correspond with the holes already in the page block.

Yoga Dog
ATC
markers on cardstock

Watercolor Paper 3D Star
painted with fingernail polish
The dots look red on my monitor but I assure you they are bright pink in real life.


I couldn't get this watecolor paper star to stay glued together. The lines weren't scored just right and it's a bit cattywompus. There's a button magnet inside this one so I'm going to work on it some more before I say to heck with it! I think it's salvageable.

I found the prefect tool for scoring lines in paper. It's a dress maker's tracing wheel. There are two different kinds of dressmaker's tracing wheels. One of them has teeth and the other is smooth. Either would work for scoring paper. I used the smooth one to score the lines in the 3D watercolor paper stars. I have two smooth wheeled tracing wheels and one with teeth. Three days ago, I didn't know I owned a smooth one, let alone two of them! I found one of them in a basket in the cutting room and the other one in the tool bucket on the kitchen table. Both within hours of each other. The watercolor paper stars were destined to be!

I've made more cranes since the last post also. I don't know how many ...10, maybe 20 of them. Been a few days since I made any. I'll show you the whole mess of them in the next post. Maybe the flock will have grown by then.

I guess that's all I have this time!
Thanks for taking a look, having a read!
Come back again!

Remember....
Be good to one another!
it matters!
Peace
831


Followers