18 November 2012

Birthday Book, Ornaments and Some Other Stuff


Hello Readers!
More art (if you want to call it that) to show you all from the last few days.

There's a birthday party today for my oldest sister. It's supposed to be a card party only but I don't do cards. I mulled the idea of a card over for a few days and nothing came to mind. I woke up this morning at the eleventh hour of this deal still not having a card or anything else to take to this party.
Then it hit me! I'll make my sister a book for her birthday and fill it with ATCs. She always oohs and aahs over my drawings so it will be a perfect gift for her.

I went through the two available ATC notebooks and dragged out all the cat ATCs I had. I needed 12 of them but found only 11 so I had to quick-like make another one.
That would be this one with the white cat sleeping in the blue spotted chair.

Then we needed something for the cover.
I wanted it to say CAT with cats. It didn't quite work out that way but close enough. I am, after all, pressed for time here!
This is markers on tracing paper, cut out and glued to the front of the book.

This is what it looks like inside the little board book. I bound it with pink crewel thread and made the pages from some old flash cards I had. Each page is two thicknesses of the card. The ATCs are not glued to the pages, just the corner tabs are glued down so if Elaine wants to put these elsewhere...she can.
I'm hoping she likes it!
Yes, I know I should have been on this weeks ago, but I work good on deadlines and the closer the deadline, the more motivated I am apparently!

I dragged out the sewing stuff yesterday and made progress.

All of the felt ornaments are now sewn together. They still need hangers but well on the way to being finished! At least the sewing is done!

Here's an envelope I started weeks ago. Not sure it's done though. I forgot I had done it. It was clipped to the place where I keep all my bull dog clips, hanging there to dry. I noticed it this morning and decided to take its picture. 

I use bull dog clips and clothespins for clamps when something needs to be clamped to stay put while it dries.

I  cut up a road map of Missouri and made some little boxes. I also used another couple pages from one of the French books my other sister gave me last weekend and some tie dyed construction paper to make more boxes. There are nine of them if memory serves me correctly.

Yep, nine of them. They still need their ribbons for hanging and they will be done.
I am not doing an ornament project this year. Not officially anyway! I am making another set of ornaments for a couple friends for Christmas though so there will be more ornaments of various materials before the Holidays are over!

When I was supposed to be figuring out something for my sister for her birthday, I was sewing pickle ornaments! 
These guys are just too dang cute!
I made 2 of them and I think more will be forthcoming!
I need to find some different color of green fabric. These two are made from the only green felt I had. Not sure I even have other green fabric that will work for pickles.
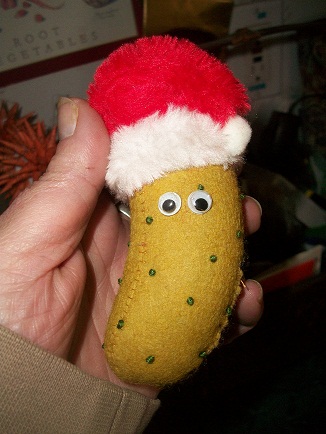
I do have some green silk but it's not really pickle colored. The silk is more blue than green. I'll figure something out! The hats are made from fake fur that was once a full sized santa hat!  They still need a loop added to the top of the hat for hanging. They're all sewn with the exception of the eyes which are glued on.
The next ones made will be a tad smaller than these two as I think they are a bit big for a tree ornament.

That poor pink velvet monster is still a WIP. Progress has been made though!
Maybe next post she will be finished. I've got all her parts cut out and ready for sewing, just need to get busy and get it done!

This is a drawing done in markers on tracing paper that will end up on an envelope in the next few days. Still trying to figure out just what that envelope will entail for it's finish! 
You know, I like doing envelopes but I have a devil of time deciding what to put on them! Mine are juvenile compared to the ones I've received in the mail! I'll just plug on though, cause you don't get anywhere if you just give up!
And I do love getting altered envies out of my mailbox!

Well, that's the extent of my creativity since the last post! 
Thanks for stopping by to see it all!

Be good to one another!
It matters!
Peace, friends!
831

14 November 2012

French Boxes, A Few Stars and Some Fishes

Hello Readers!
Same old same old going on in my life. More or less at any rate. I'm not complaining by any means! Same old same old works for me at this point!

I've been busy with creating things, like usual.
Those felt ornaments are still waiting to be sewn and that pink monster is still not born. But progress has been made in the creative department! It has indeed!

Enjoy the fruits of my labors!
:)

I tried to make some collage inchie houses.
I got no further than these four before I remembered I don't like doing collage inchies. As you can clearly tell from the picture, I'm not really all that good at it! Yes, I know, it's not for me to make that decision, but sometimes, just sometimes, I am not pleased with my efforts at all!
But there ya go, four inchie houses. 

I thought perhaps I should try twinchie houses instead. 
There was an athon for houses...inchie, twinchie and moo houses, going on over at AFA and I'd never made houses of any size before.
Twinchies didn't turn out any better than the inchies if you're to ask me.
But there ya go...four twinchie houses.

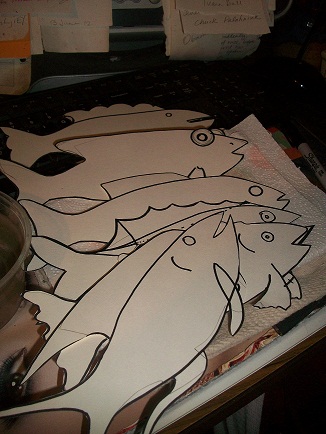
I've been working on some more fishes.

The start out as the exact same template I've always used for fishes. I believe these six put the total count on fishes at 10 now. I did these a bit different though than the last batch of fishes. I didn't make them all the same shape. I redrew around the template lines before cutting them out. This way they all look a tad different from one another.

They were covered with homemade gesso, texture added while the gesso was still wet.

A couple days later I put some pretty colors to all of them and we've got some nice fishes in the making!
They're painted with pan watercolors of the school kid variety.

I put another layer of cardstock on the backsides of these and put them under the book press for about 24 hours to let the glue dry and to keep the fishes flat.

This afternoon I added a coat of gesso to the backsides to give me the same surface as the front side is and to give the fishes a bit more substance.
Once the gesso dries overnight, I'll put some more color on the backsides, add my info and all that. I'm not sure if the backsides will be fish-like as the front sides are, but they'll be more than just stark white.


My sister came to visit over the weekend. She brought me three different books written in French. All three of them better than 50 years old each. I folded a couple of little boxes out of some of the sheets of paper from two of those books. No glue, just paper and ribbon holding them all together.

This is the same box as in the picture above. She also gave me a couple of books written in German. I don't need more books, in any language, but I didn't have any books in French or German so I accepted them happily! 
My next big project, probably after the beginning of the New Year, will be to weed out the bookshelves lining the hallway.  I've run out of storage for books in those shelves. Things must go!  Considering I haven't laid eyes on some of that stuff in a few years time, it's past time to get busy and do something about that!

These are the paper stars I told you about a couple posts back. I finally got around to taking their picture.

This is a piece of silk fabric totally covered with sequins. It used to be a prom dress. I intend to turn it into a monster or two. We'll see how that turns out!

I just loved the way this picture turned out!
Bead Soup.
I've been sitting at the workbench in the cutting room going through beads. So damn many beads, I'm sure I couldn't even count that high! I'm seeing the end of that tunnel, but it's still quite dark in the tunnel. I think another three or four days of going through beads will be in my future. Things are looking good on that front though! 

Beads are being separated into groups by color, type (such as these wooden ones in the mushroom box above), size....I have charms, tree of life beads, seed beads, big beads, little beads (bead soup), and such. 
The wire basket is also in the tote where the remaining beads to be gone through are located. Eventually, they'll all find their place on the shelf in the desk room.

Thanks for stopping by to see what's happening!
Be good to one another!
Peace
831

10 November 2012

Some Drawings

Hello Readers!

I finished up the framed magnets that I talked about yesterday.

Chewing the Cud
Magnet
markers on cardstock

I didn't put acetate over the drawings as I said I was thinking of doing. I just didn't see the point cause I didn't do any collaging on them.

Dog Love
magnet
markers on cardstock


Avocado 
magnet
markers on cardstock
This one is my favorite of all the magnets made with these little matboard frames.

Red Bird
magnet
markers and white paint pen on cardstock
I need to fix Mr. Bird's eye. I didn't notice it had smeared until I downsizing the file.

I do not have any more of these little frames, that I know of. That means I'll either have to not do anymore like this or make my own little frames. 
We'll see.

Drawing on manila paper. 2x3 inches...or there abouts. I didn't measure it, I just know it's not quite as big as an ATC.  Done in markers.

I've sewed a little more on the pink monster. I've never taken this long to complete a monster. I've always cranked them out in a couple of hours of continuous work on them. Been working on this pink one for four or five days now....Perhaps the next post you'll see the pink monster. Don't hold your breaths....I doubt she'll really be worth such anticipation. I could be wrong though, you just never know.

Thanks for coming along to read what's going on in my creative life. 
The other departments of life are going smoothly so all is quite well in my little world.

Be good to one another!
Be happy!
It matters on both accounts!!!
Peace, friends!
831


09 November 2012

Paper Stars, A Magnet Makeover and Some Altered Envelopes


Hello Readers!
I've been busy in my cutting room, still putting things away from the overhaul. I can't easily find everything I'm looking for these days but all in all, the overhaul was an excellent plan and it is showing fruition.
Now to get that pile of beads and beading supplies gone through and in some semblance of organized...I keep looking at that pile and finding better things to do than tackle that chore! 
Soon. Soon the beads will be on the empty shelf intended to hold the bead collection. Can't say just when 'soon' will occur, but soon! :)

In the meantime, when I haven't been asleep. I've been sleeping a lot here of late. I've been busy folding little brown sheets of paper into what you see in the picture below.

They start out as a 3.5 inch square of brown kraft paper. Paper bags would work beautifully for this project. That is what she's used in the tute I followed. I just happen to have a stack of heavy brown kraft paper. Not sure where I acquired this paper. I have about 30 sheets of it, quite large they are. 24 inches by 18 inches? I'm guessing there, forming my hypothesis on the size as in comparison to my guillotine cutter. The sheets had to be torn in half to be able to use the cutter on them. The cutter is 16 inches wide...at any rate, I cut the squares on my cutter and put two sheets of that stack of paper to good use. 

Here is the link to the tutorials I used to achieve the end result.  If you want to know how to construct the stars out of any old paper you have hanging around, and not do the painting on them, then just go to the first link. It will show you how to fold the units and assemble them simply into a star without curled ends as mine have. If you want the curled ends and to know how to do the painting, then you'll have to go to the second link to find that info.


This was the first of the stars completed. They are just under 4 inches across. I didn't know how easy it was going to be to fold the units as I've never made this origami project before. I discovered it was a cinch to make! Time consuming, but really easy.
You do have to keep your squares as square as is possible when you cut them as that makes it easier to fold the individual units needed. 
My painting could have been a little neater, which it isn't on the last four either, but it could have been neater! 
I used pan watercolors to paint them. Just plain old school watercolors like the kids use in grade school, nothing fancy or expensive. You could essentially make these out of things you have laying around! I think they'd look exceptional with fingernail polish instead of watercolors! 
Wish I'd thought of that before now! I have a box of better than 100 bottles of nail polish in more colors than you can shake a stick at!

You don't have to use glue on them. They will stay together without it, but I glued mine together so they can have a hanger put on them to hang somewhere. I'm leaning towards fishing line for the hanger.

I'm not sure why the one at 8oclock in the picture is bigger in the center than the others. Might be the paint? I used two different sets of paint on them. Didn't really notice that difference till now when I've been sitting here looking at the picture!
Edit:
The reason that first one is so much thicker, thus larger in the center than the others is because I did as was suggested in the second tutorial where she shows you how to paint the things. I crumpled my brown paper and then ironed it out flat before cutting it into squares. I did not crumple the paper on the others.
Give making them a shot. I made three others that I forgot to take a picture of that have flat points and are made from scrapbook paper and magazine paper. 
The scrapbook papers hold together quite tightly with a bit of depth to the finished star. The magazine paper is quite flat in comparison to the scrapbook paper. The brown paper gives the most impressive dimension to the finished star of all the papers I have used to make them. Any paper will work though.
I believe this would be a fun project to do with kids. It does take a little while, and a bit of practice to get the units folded, but you only need 14 of them to make a star. I used all of the units I made, even that first one. The more I made, the easier it got to fold them. 

My muse is fidgeting when it comes to ATCs. She seems to want other sizes to tackle. I always keep the scraps from cutting blanks and book pages. I have lots of little pieces of paper that are not big enough for an ATC, but still big enough for SOMETHING. Least that is what the muse says and I have to follow where she takes me. Keeps me sane! :)

Going through things in cutting room, I ran across five little matboard magnets with folk drawings on them. Outdated, mass produced. They begged to have a makeover!  And I didn't have to cut the paper to fit in them.

This is the only one done thus far, but the others are laying here waiting for a new drawing to grace the opening in the mat. I did the drawing on cardstock in markers and white paint pen.

The frame is 2 3/4 x 3 1/8 inches. The inside of the frame measures 1 3/4 x 2 1/4 inches. I don't know the size of the paper the drawing is on. It fit in the space allotted perfectly so I went with it. 
Before doing the drawing I traced around the inside of the frame lightly on the cardstock with pencil and only colored just passed those lines. The pencil were erased after the drawing was done. I then glued the backing to the frame and put the magnet back on with fresh glue.

The remaining four of these will have a piece of acetate covering the opening in the mat. I always think of the good stuff after the fact!  With the acetate covering them, I can do collage if I feel the urge for a challenge.
Next post you'll see the rest of these magnets.

I did a couple of altered envelopes day before yesterday. 
This one flew off to Argentina.
I didn't get the back side of this one even started. It is plain white like the front started out being. Mail run day came before it was done.

My young friend, Daniel will be getting this colorful envelope any day now. I made a three for three ATC trade with him. His first trade of any kind in the mail art world. I'm hoping it becomes an addiction for him!
I've known Daniel since he was about 14 years old. He and my youngest are very good friends. We've discovered, just recently, how much we have in common though our art. 

My zentagles aren't usually quite this colorful...I used dang near every color of marker I own with the exception of the browns and greys! I decided to send Daniel an altered envelope in the hopes that getting a really cool envelope in the mail, that contained other cool things, would truly entice him to delve deep into the universe of mailart! 

I watched a few documentaries on various subjects while completing these two envelopes. I learned a few things while doing so. 

I'll be back another day with more things to show.
I'm still working on the felt ornaments. No progress has been made on those at the present moment. I'm also still working on the pink velvet monster. Progress has been made on it. Not much progress though and none to speak of really. So, that being said, we'll see if I can deliver on those with the next post beings I totally missed it for this one like I had mentioned!
Someone had to do the laundry though!

Be good to one another!
Thanks for stopping by!
Peace, my friends!
831

05 November 2012

What Else? Art


Hello Readers!
It's going to be a short one this morning! I have places to be today!
Let's get with it .......

I made a few chunky pages over the weekend. Collage seemed to be predominate in that endeavor but the painting muse was in full force that day as well.
Some times, she just can't be satisfied with one medium.
Orange Fish
Chunky page.
Acrylics on drink coaster with part of an onion bag, some seed beads, a bit of glitter glue, then the fish which was done in acrylics on book page paper and cut out with the craft knife and lastly some more orange crochet cotton thread.

I made some make-shift stamping implements the day before I made the orange fish chunky. Those light blue stripes on the background of the orange fish are imprints made by a man-made sponge that once functioned as an air filter for a small appliance of some sort. I like the effect it made on the paper! I'll be using it again and again in the future.

I made drawings of more fish and finished the pink one you all saw in the last post.

Pink Fish
8.5 inches long
He's done in acrylics, markers and glitter glue.
I'm not so sure about having added the glitter glue. I liked him better without it but it's too late now! And he's traded so I shouldn't really worry about the glitter glue. Doesn't matter that I don't like it!

Another Fish Chunky
Pink Fish on Red
Chunky Page
Fish is done in markers on book page paper. Background is acrylics and collage on drink coaster. Collage includes some thin braid trim, a few punched paper circles from various types of paper and a bit of sequin waste

Grey Elephant
ATC
marker, acrylics and watercolor on cardstock

Brown Elephant
ATC
marker, acrylics and watercolors on cardstock

These next 2 altered envelopes are the 2 I've been meaning to scan for a couple of weeks now. Finally got around to doing that!

Celebrate 
Altered Envelope
(front)
6x9 inches
collage

Celebrate
Altered Envelope
(back)
6x9 inches 
collage

Chicken Lifestyle
altered envelope
(front)
markers
4.5x9 inches

Chicken Lifestyle
altered envelope
(back)
markers
4.5x9 inches

Following Mama
(for the sixth time!)
ATC
marker, acrylics and watercolors on cardstock


November Palm Tree
ATC
acrylics and watercolors on cardstock

Purple Cow
altered envelope
(front)
marker, acrylics and watercolors on plain white envelope
5.75x4.5 inches

Purple Cow
altered envelope
(back)
acrylics and watercolors on plain white envelope
5.75x4.5 inches

Striped Yellow Cat
altered envelope
(front)
marker, watercolors and gold paint pen on plain white envelope
4.5x5.75 inches

Striped Yellow Cat
altered envelope
(back)
markers and watercolors on plain white envelope
4.5x5.75 inches

The Littlest One
ATC
marker and acrylics on cardstock
that red string in upper left corner was on the scanner. Should have cleaned the scanner after scanning all those fuzzy red kitties from the last post! I didn't though.

I've made progress on the felt ornaments but there are still three or four of them to finish sewing and all of them to add the hangers to still. I'll show them off in the next post. Surely by then they'll done?

I've also started another monster. This one in pink velvet. Perhaps she will have come together by the next post as well?

Thanks for taking a peek! 
Be good to one another!
 It matters!
I know you all get tired of me saying that...but it does 
matter! It really does!
Peace, my friends!
831

Followers