15 December 2011

An Ornament Recap and some new stuff

Hello Readers!
Happy Wednesday!


It's time to show off the ornaments! They're all but done!
Still need to put hangers on the snowman hats, the russian stars and the last batch of birds.
Enjoy!

1. Elf Slippers

After much debate as to whether these little slippers needed to tied together somehow, I decided they were fine as free standing slippers! So everyone will get a pair of elf slippers to do with as they please! 
I ended up with 16 pairs of them, all different colors with different colored stitching and embellishments. I ended up with only two pairs that were quite similar. Just happens that the pair in the picture is one of the two that look quite similar.

These are made from acrylic felt, various types of sewing thread, a tiny gold tone jingle bell (some of them actually jingle!), some sequins, a bead and a bit of glue. 

What I learned from making elf slippers:
Felt is a wonderful material to work with! Love it!!
Crewel embroidery thread doesn't play nicely with felt. It will suffice, but the results aren't all that pretty. 
Regular sewing thread looks great on felt even when it is part of the design.
Tiny jingle bells are a right P.I.T.A. to sew on to tiny shoes.

2. Snowman Hats
I lollagagged around and put off making these snowman hats, hoping I wouldn't even need them for the ornament project. I'm so glad they made the cut and got made afterall cause they are cute as they can be! 
I ended up with 21 snowman hats. There are three different sizes of them cause I used three different paper tubes. Most of the hats have a green hatband. I ran out of the vintage satin seam binding and resorted to the red braid (I forget what that braid is called.) All the hats have similar flowers, but there are several colors of flowers scattered amongst the hats.

These are made from toilet paper, paper towel and gift wrap cardboard tubes, cereal box chipboard, a bit of black paint, some black and silver glitter glue, clear gloss varnish, sewing findings (braid and seam binding), fabric flowers, a brad and a bit of glue to hold it all together! Most of them have a hole in the top of the hat to string a hanger through. Those hangers have yet to be added. I remembered the hole needed in the top after I'd already glued 4 tops down with quick drying glue. Wasn't not taking the tops off to make it right. 

What I learned from making Snowman Hats:
One can do some amazing things with a humble cardboard tube!
The gloss varnish I used does not play well with the black/silver glitter glue. Doesn't really show up at all, even holding one of these snowman hats in your hand, but the varnish gave them a cloudy appearance when it should have been shiny. I won't use that varnish and that glitter glue together again.
Satin seam binding makes a wonderful hatband! 
Various shaped metal brads don't make very good flower centers. Should have used a bead and just glued it down.

3. Russian Stars
These are only called Russian Stars cause of the Russian book pages I used on them.
There was much debate as to what the heck to do with these stars once I had them covered in Russian text. There was much frustration as to what the heck to do with the ones that refused to lay flat once the glue was dry holding the Russian text on. I like the shape of the stars and nothing else about these!
I ended up with 23 of these. There are 2 floating around this house somewhere. I cut out 25 stars, put Russian text on 25 stars, put red dots on 25 stars, but when I was done ....there were only 23 of them and the other two have yet to be found!

These are made with cereal box chipboard (I only call it cereal box chipboard, most of the boxes are actually  something else. Food packaging of one sort or another, cake box, cracker box, ect. I don't eat a lot of dry cereal.), Russian book pages, tacky glue, red velvet ribbon punched into little circles, gold glitter glue, green glitter glue, irridescent glitter glue, vintage sewing braid in red and white and white foam snowflakes. I didn't show you all the backsides. The foam snowflakes and green glitter glue are on the backsides. These still need a hanger also. The hanger will be a length of clear fishing line. They are about 4 inches from point to point.

What I learned from making Russian Stars:
Do not go overboard with the glitter glue. 
Chipboard will not dry flat unless you weight it down with something heavy in the drying process.
Glitter glue beats loose glitter in its ability to add bling! No mess to contend with!
I'll use this star pattern again. 

4. Tufted Paper Balls
These were an experiment from the very beginning. I started off with a large light bulb from a string of Christmas lights.....the bulbs that look like chandelier lights, ones you would put outside. I made six of them with the light bulbs and wasn't pleased with how large they were! They are pretty cool, but way too big for tree ornaments! So I used 1/2 inch wooden beads as the base for the tufts of paper instead and ended up a lovely little paper ball that is quite impressive in hand! 

These are made from a medical dictionary from the 1940s. I cut the dictionary pages into roughly (I didn't measure, just cut) into 1 1/2 inch squares. The little squares were wrapped around the non-working end of a small paint brush, dipped in hot glue and attached to the wooden bead. The wooden bead got a length of wire folded in half to form a U glued into the hole in the bead before the paper tufts were attached. These went very quickly! Some of them have a pinkish hue to them because the dictionary pages were edged in red and only some of the little squares had red along the edge of one side. 
I ended up with six of the larger tufted balls and 53 of the little ones. The little ones are about 2 inches across.

What I learned from making Tufted Paper Balls:
What you use for a base doesn't always turn out like you plan. Shapes are deceptive once they're covered in tufts of paper.
Dictionary pages are quite thin and quite easy to wrap around the small end of a pointed stick.
I love my hot glue pot! 
If you don't have a lot of time to devote to a handmade gift, these tufted paper balls are a great choice as they are impressive and sinfully easy to make!

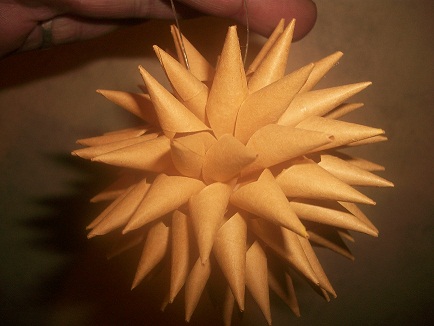
5. Paper Flower Balls
These aren't quite done yet either. I was going to spray paint them gold this afternoon cause the weather was finally cooperating but I spaced it out and they still don't have any gold on them!
These were a bit of an experiment as well. I knew I wanted a few different paper ornaments but I'd never made a kudasuma (?) ball before. I bit off a bit more than I wanted to chew but once I got started on them, I couldn't stop till I had enough for the ornament project. 

These are made from magazine pages, glue and length of white cotton string.
The balls are roughly 3 inches across. I stared out with 2 inch squares cut from magazine pages. It takes 60 little cones to make one flower ball. 
I ended up with 19 of these.

What I learned from making Paper Flower Balls:
I don't know a lick of Japanese!
Folding tiny squares is very therapeutic.
If you're in a hurry to produce an ornament, these are not the ones to take on!
Television comes in handy when you're doing mindless work.
(You all know I don't own a TV, so I sat in front of my computer watching TV shows on hulu.)
Making these from one color of paper makes them much prettier than the magazine pages, but I didn't have enough of one color of paper (other than the orchard paper, brown kraft paper and white copy paper) to make enough of these for the project.
Thicker paper than magazine paper is easier fold.
The bigger the square you start off with, the bigger your finished ball.

6. Folded Paper Wreaths
Another sinfully easy and impressive ornament!

These are made with a map of Oklahoma (I used 4 maps for 32 ornaments), green glitter paint and a tiny fabric ribbon. Hangers are clear fishing line.

They start out as 8 pieces of paper cut to 4 inches by 2 inches and folded so they interlock. There is no need for glue, they'll stay together without it! I painted mine with the green glitter to give them a bit of sparkle and to hold them together a bit. 

What I learned from making Folded Paper Wreaths:
Outdated maps are useful in creative endeavors!
If you don't cut your papers square,  your folds won't turn out right and you'll end up with a wonky wreath.
Fishing line makes a great hanger for lots of things!

7. Polish Stars
Another experiment that turned out just right!
These look a heck of a lot more complicated than they are! 

These are made from orchard paper (not sure exactly what orchard paper was used for originally. There are different opinions according to google. It wasn't, however, originally made for arts and crafts!), tacky glue, memory wire used in jewelry making and two sequins to hold it all together. You'll need a sharpened pencil as a tool to make the points. 
This is mindless work one can do in front of the television. I watched every episode of Chicago Hope while making 23 of these buggers! They aren't quick by any means, takes about an hour for each ornament.
I plan to make more of these! Next ones will be made with some fancy gift wrap paper. Any paper will work though!

What I learned from making Polish Stars:
Beauty can be found in humble paper!
A regular old #2 pencil is a great tool.
Some things you cannot glue together with glue stick.
Patience is indeed a virtue! If you can make your first one of these without pulling all your hair out, you'll make a hundred of them!
Memory wire is some really cool stuff! (I'd never used it till these were made.)

8. Red Flower Ornaments
I had my doubts about these turning out as good as they did. My photography skills need a bit of work but you get the gist of the idea. These were really fun to make! I hadn't worked much with egg cartons before this experiment.

These are made with  pressed paper egg cartons, red and green acrylic paint, some green yarn and gold tone jingle bell. The leaves and flower cups are all cut from egg cartons, painted and assembled with the green yarn.  The leaves are painted with two different colors of green. This is an easy ornament that you could make with your kids. There's no getting it wrong! 

What I learned from making Red Flower Ornaments:
Egg cartons should never be thrown away! (recycled, yes, tossed in the trash, NO NO NO)
A sharp needle will go through a pressed paper egg carton flower with NO TROUBLE at all!
Egg cartons take a lot of paint to get the color right cause they are quite absorbent.
Green yarn is easily found at the thrift store!

9. Little Book Ornaments
These were an adventure to make! I've made a ton of little books this year and these are the smallest of all of them! 1x1.5 inches. Once you learn to make books, you can tailor the size to your liking! Books are quite easy to make once you master a few techniques. 

These little books are all hand sewn in the coptic stitch. They have five signatures of  3 sheets of copy paper, giving them 30 blank pages to do whatever you want on. The covers are made from game boards, gold foil paper and green velvet material. There's a bit of hot glue holding the page blocks to the covers and tacky glue holding the covers together. I glued the bales in between the page block and the spine of the cover so it's not going anywhere unless you give it a big yank! There are beads strung onto a christmas tree hook and attached to the bale along with a few lengths of broken necklace chain.

What I learned from making Little Book Ornaments:
Work quick when you got hot glue involved!
Velvet is lovely cover material. Nice to touch. It glues wonderfully.
Gold foil paper (wrapping paper) isn't a good choice for end papers. It doesn't play well with hot glue.
Metal Christmas tree hook wire is an excellent substitute for jewelry wire when you're making rigid pendants with beads. It's a nice shiny silver color too.
Little kids are fascinated by such tiny books!

10. Angels
I had a fabulous time with my mother making most of these little angels. She and I made 16 one day, I woke up the next morning faunching at the bit to make more and ended up with 36 of these.
Ma found the pattern for these in a book....The ones in the book were almost a foot tall! Much too big for an ornament on the tree. We sized them down a bit and went off the pattern a bit with the angels hair. The book angels had doll hair.

These are made from a wooden skewer cut down to about 6 inches in length, wrapped with quilt batting secured with white cotton string, a wooden bead glued to the end of the skewer, wings are wired gold mesh ribbon, halo is a length of wire wrapped around a large Sharpie to make it round, hangers are copper wire. Each angel has an embellishment on her chest. Some are plastic gemstones, some are fabric ribbon flowers and some are fabric roses. The angels' hair is gold glitter paint and their faces were put on with a brown sharpie. Glue used is hot glue and tacky glue. Some of the angels were slapped with some irridescent glitter glue along the white parts of their bodies, some weren't. 

What I learned making Angels:
You don't need to buy a thing, just look in  your stash, you probably have everything needed to make these. If not, you can probably improvise. Make them your own!
Quilt batting isn't just for quilts.
If what you see in a book appeals to you but you don't like it quite like they've presented it, 
change the rules! That's allowable in art!

11. Paper Mache Birds
I sold one of these birds right out from under the project this afternoon. That was a pleasant surprise!
These were the first of the ornament project. They actually inspired me to make a whole set of different ornaments for all the families I know for Christmas this year. Should have started on the ornament project way earlier in the year, but at least I did start (and finished it!). 
I made a total of 21 birds. One of them still needs the details painted on it, nine of them still need some sort of hanger attached to their backs and the last batch of nine that I made, I decided they weren't getting legs and feet. Good thing I made that decision too cause I left my needle tool at my sister's house 160 miles away and it is a vital tool for attaching legs to paper mache birds! The last nine birds will get an eyehook in their backs to hang them.

These are made from newspaper, watered down (1/2 and 1/2 more or less...I just eyeballed it) white PVC glue (plain ol' white school glue), white tissue paper, wire and crewel embroidery thread for their legs. some acrylic paint, white paint pen and black sharpie.
Each little bird is different. There is no way to make two of them alike! They range in size from a sparrow to a small parrot. Their legs can be posed to perch them on a branch on the Christmas tree or anywhere else you might want them to sit. 

What I learned from making Paper Mache Birds:
I didn't realize just how much I enjoy doing paper mache till I tackled the bird project!
Humidity makes paper mache dry very s-l-o-w-l-y. Take that into consideration when you determine the schedule you need to adhere to when making paper mache on a deadline.
Who would of thought old newspapers and a dab of paint could be so cute!

12. Inchie Cubes
I made these way back in July not even thinking about the ornament project at the time. They aren't very Christmassy but they do look adorable on the tree. My tree this year has a modgepodge of different ornaments so these do blend in quite nicely. I think there are six or seven of these on my own tree this year. 

These are made with inchies I made throughout 2009. I made 970 some inchies that year. Missed my goal of 1000 by just under 30. The inchies are mostly markers on recycled cardstock. Some are done in other mediums as well and others are done on recycled paper quite similar to cheap watercolor paper. It was originally photo album paper...you lifted up the flap with a square hole in it and put your picture there. I cut all I had into 1 inch squares.
They're taped together with regular old scotch tape. I fashioned a hanger from a length of copper wire and seed bead to insert into the corner before they were all taped together. 

What I learned from making Inchie Cubes:
It takes a long time to make 1000 inchies!
These were easier to tape together than you would think.
These make wonderful rear view mirror ornaments for your car.

The ornament project was a success! I still have a few little details to work out and find some sort of box to package them all in but I'm pleased with my progress~!

Here are a few other things I've been working on!
A close up of the plastic origami crane hanging on the Christmas tree. Even if I could take good photographs, I don't think a photograph would do this little crane justice! I'm going to make more of these throughout the year for my inventory for the craft show in September.

Another close up of ornaments on my tree. There's an inchie cube up at the top right/middle, a folded paper flower ball made with white copy paper with poetry written in red on each of the little squares used to fold the cones and then edged in black sharpies before folding. I really like how it turned out! You can't read a lick of that poetry but that's how I intended it! I was just going for the handwritten look, not the value of the poetry. I wrote the poetry, all my words...but that's irrelevant. There's also one of the Polish Star ornaments off to the left top. I've never had those wooden bead garlands on the tree before this year. I like how they look with the variety of ornaments.


I went on a sewing spree yesterday. 
My computer monitor bit the big one and there was no playing on the PC last night so I sewed hot pot holders. They all need some binding around the edge still. They're all slated to be Christmas presents.
Hearts Hot Pot Holder

Reclaimed sweater material, fleece material, velvet, and cotton. All material came from old clothing. Four layers for the hot pot holder itself and then the hearts and circles (freehand cut circles!) were sewn on with regular red sewing thread in a whip stitch.


Orange Kid Hot Pot Holder
Again all material is from old clothing except for the felt used on the dress. Yellow and green are felt. Old sweaters and fleece for the hot pot holder itself. Four layers. I used various types of thread to sew the parts on to this one. It still needs a binding of some sort around the perimeter of the hot pot holder.

Owl Hot Pot Holder
Reclaimed material from old clothing with the exception of the owl's feet which is from a fat quarter I bought some time back. Four layers of fleece, old sweater material. The owl is made from a sweater that had 'hair' so he's kinda fuzzy, stringy. 
On all the pot holders, the four layers are sewn together with a running stitch like you see on the owl pot holder. I just wanted to quilt them together so they didn't shift on me while sewing the pictures on. Collage with fabric is what these are! All hand sewn! I don't get along with a sewing machine!

I discovered a new endeavor the other day and while the PC was out of commission last night, I wove this little mug rug out of odds and ends of yarn and crewel embroidery thread on a cardboard loom.
I had expected it to turn out SQUARE. The loom is square. The mug rug isn't square but it's big enough to sit a coffee mug on without any trouble at all! Weaving takes a long time. I worked on this little rug for almost three hours from beginning to end. That time includes the making of the loom as well. The loom was 5 inches square. The rug ended up being about the size of a postcard. I need to figure out a shuttle for this tiny loom. I fashioned what I thought would be a good shuttle out of a piece of copper wire. It works pretty good till you get to the end of your weaving. Then it gets to be a tight squeeze and doesn't work so good. I will just have to fiddle with it to see what I can come up with.


And since I've not shown all the critters for a few weeks, here's my furkids.


Lola taking a bath. 

Fred sleeping in my recliner. His head on the end table cause he's way too big to fit in that chair! Oh my goodness, you should have heard the snoring coming out of that dog when I took this picture! He was sound asleep! He sure doesn't look very comfy! He always acts as though I've burst his balloon when I make him get out of MY chair so I can sit in it. He moans and groans and makes a big scene.

And last but far from least, Billy asleep on my bed. That patchwork quilt he's sleeping on is one of the best buys from a yard sale I've ever gotten! That quilt is machine sewn but hand tied, made from corduroy, an old blanket and flannel for a backing. It's the warmest blanket I own! I gave a whole dime for it!
The foot of my bed is Billy's favorite sleeping spot. He spends hours every day sleeping in this spot!

You all be good to one another!
Spread some smiles!
Give some hugs and kisses!
Peace, my friends!
831

10 December 2011

Something New and More Progress

Hello Readers!

I really like to fold paper! Origami is a great project regardless what you undertake to fold your piece of paper into! 
I'd never made paper cranes till the night before last. I really can't say I've made a paper crane still! 
I found a tutorial to fold cranes out of clear plastic like you'd find stickers and paper and all kinds of things packaged in. 
It's a bit harder to fold than actual paper is but it works! And I LOVE the results! 


 It looks like glass when in hand! I hung it with a piece of 6lb test fishing line so the hanger pretty much disappears and the crane looks like it's floating! This is the only one I made. What fun though and I will certainly be making more of these!
This one is about 3 inches from nose to tail. The hardest part about this project was cutting the plastic into an even square! I cut my square about 4x4 inches. Bigger would have been easier to fold. I've no clue what my plastic came from. There are different thicknesses of it. I think mine is a bit thin cause the crane's head doesn't want to stay folded. I think if the plastic were a hair thicker the creases would be firmer and they wouldn't come apart.
I love how the crane's shadow is on the ceiling behind in it in the picture!

Progress has been made on the ornament project!
Paper mache birds now have some color to them other than that drab brown I showed you all last time!
I'm not happy with these birds! I think they are ugly! But...that isn't for me to decide! I just keep the muse happy and make what she's tell me to! 
They aren't awful birds, just not near as cute as the first batch! I wasn't happy with the second batch either and others just raved about how cute they are!
So, not for me to decide!

I still have one more pair of elf slippers to sew together and add sequins and bead to. These are the finished ones of the bunch. Jingle bells attached! Those jingle bells are a pain in the butt! But they do add to the little slippers a lot! Glad Ma thought that idea up! I still have 16 jingle bells to attach!

Flowers balls are all put together!
YEAH!
(I am sick of making flower balls!)
These aren't quite done. Tomorrow they will get a spray of gold paint to give them some sparkle. Perhaps a bit of glitter will end up on them as well. Work in progress, plans subject to change!

Snowman hats are in the works!

21 of the little devils
I really didn't see these snowman hats materializing this evening. But there they are! I sometimes surprise myself! They still need a coat of black paint on the outside before we can continue on to prettying them up with some ribbon for a hat band and a little flower of some sort. Not all of them will have the same flower. 
I'm still figuring out what to use for a hat band....seam binding? ribbon? upholstery material? I'm uncertain at this point. 

I found the can of inchie cubes! I said I wasn't making snowman hats if that happened, but I'm taking the beaded dangly things out of the project and using the inchie cubes instead. 

 And here's the basket of angels all ready to go! There's 38 angels to work with!

The ornament project IS coming along nicely!
I only wish I had taken more pictures along the way. And I really wish I'd of started a whole lot sooner in the year! Next ornament project I undertake will be started in Janurary! Maybe February....I already have a project in the works that will take all of January to complete. 
I'm only in the 'gathering phase' at the moment with that project. When it starts to come alive, I'll share with you all!
There may not be an actual ornament project in 2012.  
As I said, 'plans subject to change!'

The Ornaments Thus Far:
Angels
Polish Stars
Flower Balls
Inchie Cubes
Red Flowers
Map Wreaths
Paper Mache Birds
Snowman Hats
Little Books
Russian Stars
Tufted Paper Balls
Elf Slippers

I have 10 days to get it all done.......

This Lola cat sometimes sits in the deskroom and watches me type on the keyboard. She sits atop the printer most of the time. She's sitting on the antique green stool in this picture. I'm showing her off cause this is one of the better pictures I've ever taken of Lola! a.k.a. Brat Cat

And this is what Fred does best! He stole my chair in the living room earlier this evening. I had just finished cutting out all the components for the snowman hats and went to the kitchen to fix myself something to eat when he decided the sofa wasn't near as comfy as my chair. I let him warm it up for me for about an hour and then he acted like I had upset his routine something fierce! Lazy dog! He is so funny though, one can't help but love him! 
I don't know where Billy was when I was taking pictures so he didn't get his picture taken today. That probably doesn't hurt his feelings in the least! He doesn't mind his picture being taken but after the first one he  usually closes his eyes in anticipation of the flash. He was probably sound asleep on my bed at the time.

Present wrapping has come to a standstill. 
I must remedy that situation or I'll have a frantic day of wrapping everything and I hate it when that happens as it does most every Christmas! 

Last year I baked over 100 dozen cookies. I was still baking cookies two days before Christmas! 
I said 'never again'. 
No baking at all this year! 
Though I may make a nice cake for my friends in town. 

I'm done rambling for today....
Be good to one another! It matters!
Peace, my friends!
831

03 December 2011

ornament project recap and it snowed!


I took this picture about 8 hours ago. It's cold, snowy and not fit for man nor beast out there in my neck of the woods today! I think it is still snowing! 
One should be able to see the tree line across the field behind the house, but it was snowing quite heavily this morning and that tree line is nowhere to be seen in that picture I took!

I've been busy today with my list of things to do....
I thought I'd do another ornament recap mostly so I can see what's done and what still needs done to finish this project! 
Things are coming along nicely though.....

1
I have 21 of these little book ornaments done.
I had 22 of them but I gave one to Brenton while I was down visiting the kids in Nickerson.

2
There are 38 Angels ready for new homes.

3
There are 15 of these beaded wire dangly things. I still need to make one more.

4
I made 53 of these tufted paper balls. That gives me more than enough of these for the ornament project. I figure I'll hang on to the leftovers and try to sell them come September. I have plans to do the craft show over in Lucas in September of 2012.

5
Unfinished elf slippers. I have one more pair of slippers to sew and all of these to put the sequins and beads on. All of the slippers need their jingle bells sewn on the toes still.

6
There are 14 Paper Flower Balls hanging here. I need another 2 of them for the ornament project. I have enough paper cones folded to assemble at least two more. If there are leftovers, they will be slated for the craft show as well.

7
I made 32 of these. I'm pretty sure all of these will be gone and none will be left over for the craft show as I plan on sending these out with Christmas cards to folks who aren't getting a set of ornaments.
Good thing about the map wreaths is they are extremely easy to make and one can make a bunch of them in a short time!

8
I painted birds this morning. Here they are with their first coat of paint. They still look like this! Tomorrow they get some color....actually  tomorrow, they should be finished!
I've decided these birds will not be getting legs. I'm going to put an eye hook in them and hang them.

9
I made 23 of these Polish Stars for the ornament project.
I'll be making more of these before September comes along! I want to make some different colored ones!

10
There are 27 Red Flower Ornaments for the Project. And 7 more that can be put together as soon as I paint some more leaves for them. They'll be considered leftovers for the craft show in September as well.


11
Star Ornaments in the works!
Need to figure out how to make these things lay flat! They need some color in the guise of glitter paint and a button in their centers!

I've seen quite a few things made with cardboard tubes so the hard part is going to be deciding just what to do with them all! I'll keep collecting them for future use! 

I just numbered the pictures and realize I have only 11 ornaments pictured. I can't find the gallon can full of inchie cubes I made earlier this year. They were to be a part of the ornament project. If I can't locate them in the next few days, the snowman hats are my standby! I'm hoping to find the can of inchie cubes!

That's all I have to report today!
Keep your smiles through the hectic chaos that is the Christmas Season!
Be good to one another! It truly does matter!
Peace, my friends!
831

02 December 2011

Progress


I've been home now for right at 48 hours. Wish I could say I've made tons of progress and have pictures to prove it. Some of it, you will just have to take my word for! 

Apple Embellishments
These are NOT part of the progress made on the ornament project! I made these as prototypes for the ornament project in early October. I'm just getting around to taking their picture. They did not make the cut into the ornament project! 
Technically they aren't ornaments but with a little impovising they could be.

While at the kid's house, I made a few shoes.

This is a picture of ALL the shoes made thus far, except for the two sitting on the table in the livingroom that I  sewed today. Forgot to take their picture!
The Elf Slippers still have a bit of work to do on them before they will be done!
All the naked ones need to look like the ones with sequins and beads and they all need a little gold jingle bell sewn to their toes. Oh and there are still 2 slippers to sew. I do have them cut out and the thread ready to sew them together.. Just need to find an hour to sit in the daylight to do that sewing.

The rest I'm about to say you will just have to take my word on cause I didn't take pictures.
On the kitchen table are nine paper mache birds waiting for their first coat of paint. I put wings on the last three yesterday and got the others all ready for painting. This project is going OK, not on schedule, but OK. 

Also on the kitchen table are 25 chipboard stars working their way towards being star ornaments. 

There's a sack full of toilet paper tubes, paper towel tubes and one gift wrap tube hanging off the back of one of the kitchen chairs that are slated to become snowman hats.

I've no idea what the 12th ornament will end up being right now. I'm hoping to figure that out in the next 22 days...cause that's the amount of time I have left to make the ornament project a success! 
All's good. I'm on it!

Be good to one another! It matters!
Get some hugs and kisses! Give some while you're at it!
Peace, my friends!
831

01 December 2011

Musings of a 2 Yr Old!

I've been away for the last 8 days visiting my eldest son and his family. I did work on the ornament project while away. Got quite a bit done on that front actually. Perhaps in the next few days I'll have time to download the pictures I've taken to show the progress made.
I took very few pictures while away. I had a great time with the kids though! I learned a few things from my 2 yr old granddaughter, Lil A.

Shoes are a girl's best friend and it really doesn't matter whose shoes they might be! She stole mine the second night I was there. Her daddy had to chase her down to retrieve his shoes from her when it was time for him to go to work yesterday.

Big Black dogs are good pals! They like hugs, kisses and being brushed by little girls.
Big Black dogs are not ticklish. Fred got a bunch of hugs and kisses from Lil A every day we were there. And every morning while Fred lay out on the carpet in the livingroom she would put her little fingers in his arm pits and say 'tickle, tickle, tickle, Fred. Fred, tickle, tickle, tickle.' and then she'd look at me and say, 'Why Fred no tickle?'


Fred sneaking a taste of Annabel! He knows dog kisses are not allowed but he could have cared less about that rule when the pair of them were close to each other!

Ewwwww! Dog Kisses!!!!

I was quite impressed with ol' Fred's tolerance and gentle nature towards her. She lay atop him on the floor quite a few times and he just took it all in stride. He was a hurting dog when we got there on Tuesday night (the vehicle we rode in was high off the ground and he don't jump so well these days...we had a few tense and painful moments for Fred on two occasions) yet on Wednesday morning she started the tickling routine and that dog could have cared less. He'd get a dog kiss in every now again and he was happy. Dog kisses aren't allowed but he really didn't care about that rule where Lil A was concerned. And she didn't mind too much either. It's his tail she learned quickly to stay away from!


I learned I am not equipped to sufficiently look after a 2 yr old on my own. They are BUSY little beings!  I did do a reasonable job of keeping her from underfoot when Thanksgiving dinner was being made. She don't sit still for long but I had her 'folding' papers with me when I worked on the Paper Flower Ornaments. She'd get through wadding up four or five squares and she was ready to do something else. We had drawing paper scattered out too so she'd 'fold' papers and then color a bit and then she wanted the scissors and then she was off roaming the house talking to everyone. She's a little talker no doubt about that!


Big Black dogs will eat as many dog bones as a 2 yr old can get away with shelling out!

Dog brushes belong in the refrigerator. Thankfully it wasn't the real fridge, but her play kitchen's fridge. She stole my hair clippy the same night she stole my shoes. I found my clippy in the fridge with the dog brush. I don't know how many times I asked her where Grandma's hair clippy was. I found it purely by accident! Thought it was long gone!

She wouldn't tell me where my shoes were for almost 36 hours, but she told me just where that dog brush was the first time I asked!

Do not pass gas anywhere near other people when you have a 2 yr old in tow. Everyone within earshot will be privvy to it and under no uncertain terms know that Grandma farted! This makes me feel incredibly old despite having only 50 years behind me! I smile about it though. It was the biggest laugh I've had this year!


RJ and I took Lil A to Salina with us on Saturday to go shopping. I am not fond of shopping in the least! We did OK though cause RJ isn't a big fan of shopping either. He's a man shopper....likes to make a quick run through...find what he's looking for and don't dilly dally around. My old body can't abide that dilly dallying anyway so it all worked OK and I got a bit of Christmas shopping in. I'm pretty much DONE with shopping! I still need to find Ma something special, but other than that....I'm good to go!
Just need to wrap all that stuff in the closet!

Found myself a few things while out shopping. I robbed my piggy bank for this shopping spree. I figured I was due a few needed items out of that stash! I got a pen torch for $1 and a few things from the clearance aisle at Hobby Lobby. Found that glue I needed too! I really wanted a bottle of gesso but for some reason there must of been a run on gesso at Hobby Lobby cause both stores I went to were out of it! Found some copper coated steel pins for $1. Must be close to 200 of them in those two packages...not sure what I'm gonna do with them, but you can bet that pen torch and a pair of vice grips will be involved! I'm thinking sculpture of some sort!
My sister's flamingo got a broken leg on the trip home. Gonna have to make it some new legs. Luckily the flamingo himself didn't get broke. He's made of glass, wouldn't be able to fix him. His legs are simply acrylic beads shaped like flamingo legs. How hard can it be to build him a new pair?
I haven't actually unpacked all my bags yet. My bed is still covered with bags of stuff after being home for about four hours! I did unpack part of it though.
I don't think there will be any pictures today. I still have a ways to go with the ornament project but I have 24 days to accomplish that and I have a plan in motion so all should go rather smoothly on that front.
I folded cones for the flower ornaments and sewed 8 pairs of elf slippers in the eight days I was gone so I truly did get somethings done. Can't say for sure when I'll post again. Soon though. I need to keep track of what's done and what's not done with the project.
Right now though, I'm gonna clean off my bed, take a shower and climb between those clean sheets!
Be good to one another! Give out some kisses today! Make hugs the bonus!
Peace
831

14 November 2011

Red Flower Ornaments and some other stuff

Hello Readers!

Just as I started this post that silly Lola cat decided she needed a nap on the desk. When I let her nap on the desk, she sleeps laid out between the keyboard and me with her head atop my right arm. This works out OK for both of us when all I'm doing is playing Mahjongg or some other mindless game, but it doesn't work for me when I'm typing. She had plenty of my time throughout the night when she slept on me. I woke up to a cold kitty nose about two inches from my own nose! And my feet were nice and warm with Billy's head draped over them. Fred's not allowed in the bed. He has his own pallet to sleep on.
He forgets he has his own bed sometimes and sneaks into mine when I'm not in it. He always looks so defeated when I catch him there...I'm holding strong though! Dogs are not allowed on the bed!

It's a beautiful day in my neck of the woods and the critters can't decide if they want in the house or out in the sunshine. My weather page is telling me it is 58F.
I've just let Fred and Lola outside again. Fifteen minutes ago I let all three of the furkids IN the front door. Gonna be a busy day of donning my butler's outfit!

Looks like you're in for some chatter before I show you the Red Flower Ornaments

Ma got a new cat with built in extras. This lady had a mama cat and four kittens she wanted to give away. She was already trying to give these tiny kittens out to anyone who'd take one. They aren't old enough to be taken from mama yet! She wanted to give all the cats away cause she was moving and couldn't take them with her. Ma only wanted a kitten. She's been hunting for a new kittens for months now. She took mama and the kittens when she saw the two little siamese in the bunch. 

Sorry it's not a very good picture. I want a new camera! 
Not sure how I managed to walk to Ma's house without Fred right on my heels but Ma and I had a good ten minutes of kitten time without that fool dog sticking his nose in the thick of things! He do love himself some kittens! Mama Cat wasn't too impressed with that big black dog sniffing her kittens. She didn't attack but she growled the whole time Fred was near. He paid that cat no mind at all and just kept on sniffing! 
I think the only thing that saved him from an attack of black cat is the fact he's a BIG dog! Mama Cat only knew about little dogs. About 10 little dogs that did not like cats! I think she wasn't quite sure what to make of that big black dog, that and Ma was petting her telling her Fred wasn't going to hurt those babies. 
Those babies are ADORABLE~! No, no, no. I don't need another cat. 
Ma's already got the little gray kitten given away and she's going to keep the two siamese. She's thinking she might keep mama cat too so all's that is left is the little black kitten to find a home for. I do not need another cat. Two is plenty, thanks!

After we mauled kittens for a few minutes we sat in the livingroom shooting the breeze and I said I was headed home. Ma said she'd give me a ride to home. She lives two doors down from me...about a city block away....anyway we get in the truck and she drives right by my driveway and says we are going for a ride in the country. 
I was glad I had the camera along!

Pictures don't do these hills justice! They're gorgeous this time of year!
We took a drive of about 20 miles or so...out in the middle of nowhere! I'm not sure just how many miles it is on the route we took. It's a nice drive though. Even better when you're the passenger, as I was!

We stopped on the bridge on 20 road to look at the water and look who was looking back at us!

I zoomed in as far as I could. He just stood there, looking back at us. The flash on the camera didn't seem to sink in to him. He was awfully pretty and mighty nice of him to pose for a picture! I think I got six or seven shots of him before he took off. This was the only living wildlife we saw on our drive. 
The spot the deer was is only about a quarter mile (as the crow flies) from my front door. There's really not a lot of water in the river right now. That's the Solomon River.
It was a great day for a drive. I'm glad Ma kidnapped me!

I promised you red flower ornaments in the title of this post.

Egg cartons, green yarn, gold jingle bells and acrylic paints. 
I love them! I ended up with 28 of these. Still seven more to be put together but they will have to wait till it's time to paint the new hatch of paper mache birds. I ran out of green leaves when assembling these. 

This is a terrible picture of an inchie cube colored with sharpies. It's simply a cardstock box on a string. I inch square. I made five of these things and forgot to take a scan of the four I sent off to Scotland a few days ago. 

I have the makings of nine birds drying on the kitchen table. I started on them day before yesterday. All of them have tails, only one has wings and a tail. They're coming along though. 

Paper folding for the Paper Flower Ball Ornaments is going slowly. I got one whole ball made yesterday but it wasn't really progress. I made it out of copy paper that I wrote some poetry on in red sharpie. It turned out pretty cool. I have yet to take its picture. I have enough paper cones folded to make about 2 entire balls but I need at least another 7 to have as many as I'd like to have. 
I've determined for this project to be a success I will need 14 of each ornament. 
Here's the rundown of what is already in the works:

1
Paper Mache Birds
have: 13

2
Elf Shoes
have: 5 pairs

3
Angels
have: 38

4
Spiked Paper Balls
have: 23

5
Folded Paper Map Wreaths
have: 16

6
Tufted Paper Balls
have: 53

7
Flower Balls
have: 9

8
Red Flower Ornaments
have: 28

9
Inchie Cubes
(not this particular inchie cube though...will be the ones I showed you all some posts back that are made from inchies and taped together. This is one is made from a box template.)
have: 34

I still have to come up with three more ornaments and finish up what I need from these on the list already started. I have about 40 days to do that....
I have cut the covers and some of the paper for 22 little book ornaments. Those will take a few hours to finish preparing and an afternoon to put them all together. 
Still a lot of work to do in 40 days!
I'd really like to have an even dozen ornaments for each gift. That isn't set in stone but it's a much nicer 'set' than say 9 ornaments, or 10 or 11...I'm shooting for an even dozen! We shall see if that happens or not!

So I'm busy with my hands and staying out of trouble! 
Be good to one another! 
It matters!
Peace, my friends!
831


Followers